Don't Miss

Latest Posts
Browsing Category "Blogging Tips"

How to Automatically Remove Spam Links from Blogger Comments

- 16 Comments
Comment Spam is a major issue for all bloggers and identifying/removing spam comments is among the most frustrating job for a blogger. We all love comments but identifying spam comments from hundreds of comments is the toughest job, especially when you don't have time to moderate all those comments. Obviously you don't want to remove all comments just for a few spam comments. As we know that Blogger doesn't have a real-time spam detection plugin, so its your job that how you manage with spam comments. Today, in this article, we will show you that How to Automatically Remove Spam Links from Blogger Comments.
Automatically Remove Spam Links from Blogger Comments

Method I : Use CSS to Completely Remove Links

Step 1. Log in to your Blogger Account
Step 2. Select your Blog >> Template >> Edit HTML and search for the ]]></b:skin> tag
Step 3. Copy the below code and Paste it just above/before it

.comment-content a {
display: none;
}

Step 4. Press the Save Template button and you're done

Method II : Use jQuery to Remove Links

Step 1. Log in to your Blogger Account
Step 2. Select your Blog >> Template >> Edit HTML and seach for the <body> tagStep 3. Copy the below code and Paste it just after/below it

 <!-- Remove Spam Links -->
<script>$('.comment-content a[rel$=nofollow]').replaceWith(function(){return ($(this).text());});
</script>
<!-- Remove Spam Links -->

Step 4. Press the Save Template button and you're done

From Editors Desk

I hope that this article helped you in Removing Spam Links from Blogger Comments. Share it with your friends and don't forget to subscribe us.

7 Ways to Increase your Blog Traffic

- 4 Comments
Started a New Blog? Don't know how to drive more traffic to your blog? Don't worry, today in this article we are going to share some top ways to increase your blog traffic. Traffic is one of the most important parameters of your blog, the more traffic you have, the more people you have to read your ideas and articles. If you want a strong readership for your blog, its obvious that you need to create great content. But that's not sufficient, not only great content is required for a successful blog. Create great content, share it on social networks, that's not all that is required to build a thriving blog. To build a thriving blog, you also need to learn that how to drive traffic to it. There are almost unlimited number of ways to increase traffic to your blog, here are 7 top ways to get you started.

Content is the King

We know that people visit our blog to get knowledge or to learn something new. If you've published quality content on your blog, then people will your blog regularly as they know you're providing great content to them.If your content is helpful for them, them they'll visit your blog daily as they know that you'll publish something new in which they're interested. Which means that about 70% of your blog's traffic depends on your content. As Content is the King, so if your blog contains quality content then there is no doubt that people will not visit your daily, again and again.

Guest Blogging

Guest Blogging is another great way to drive more traffic to your blog. Write Guest posts on other top blogs, if your post gets accepted, they will publish your post and in return you'll get a back link to your blog, top blogs have thousands of daily visitors, which means thousands of people will read your article and in return you'll get great traffic from that post. So write quality guest posts and increase your blog traffic.

Submit your Blog to Search Engines

Submit your blog to top search engines like Google, Yahoo and Bing. Most search engines provides you a submit button to submit your links to them. As we know that the Google search engine is the biggest search engine, millions of people search their queries daily and no doubt, bloggers too. If your blog appears in Google search result then you'll get traffic from Google. Google provides its Webmaster tools to justify your appearance in Search Results, so you should use webmaster tools to increase your search appearance. We also have written some quality post on this topic. Check them Out:
How to Submit your Sitemap to Google Webmaster Tools
How to Submit your Blogger Blog to Google Webmaster Tools 
How to Submit your Blog/Website/URL to Google, Bing and Yahoo!
How to Submit your Blog/Website to Google

Promote your Blog on Social Media

Submit your blog posts on social media websites like Facebook and Twitter is a great way to boost your traffic. Create a Page on Facebook >> Promote it >> Submit your Posts on your Page and you'll see a great increase in your blog Traffic. So, use social media and boost your traffic.

Focus on your Design

The first thing that people notice when they visit your blog is your blog design. So, if you want people to stay on your blog then you should give your blog an eye catching look, once they're interested in your design then they will read that what you've published on your blog. To make your blog attractive you should give then a clean design which includes Beautiful Header >> Easy Navigation and User Friendly.

Submit Your Blog to Bookmarking Websites

Another great way to boost your blog traffic is to submit your content to best bookmarking websites like stumbleupon, Reddit, Digg and more. So, submit your blog posts to these bookmarking websites and boost up your traffic.

Add Images

Images don't just make your blog pretty but also increase your traffic and search engine listing. People often use Image options provided by search engines like Google and Yahoo. So, adding images to your blog with search engine optimization can easily boost your traffic.

From Editors Desk

There are hundreds of other useful methods to increase your blog traffic, we just have shared just 7 of them and we'll try to share all of them. We hope that this article will help you to increase your blog's traffic. Share this article with your friends and don't forget to subscribe us.

How to Change Mouse Cursor in Blogger

- 6 Comments
You might have seen that many sites have their own mouse cursors. When you move your cursor on their blog, the cursor automatically changes and a custom mouse cursor makes your blog different from others. Recently, one of our readers asked us to write an article on changing mouse cursor of your blog. So today in this tutorial, we'll learn that How to Change Mouse Cursor in Blogger.

What is a Mouse Cursor?

In the computers, a pointer or mouse cursor is a graphical image on the computer monitor or other display device. A cursor is an indicator used to show the position on a computer monitor. It is mostly used for clicking, select or for moving folders/files from one place to other.

How to Change Mouse Cursor in Blogger?

First of all, log in to your Blogger Account and select your Blog. Go to Template >> Edit HTML >> Search (Ctrl + F) for the ]]></b:skin> tag and paste the following piece of code just above/before it.

body{
cursor: url(Your Cursor Image), auto;
}

Now replace Your Cursor Image with the image URL of your cursor and press the Save Template Button.
Note: You can get hundreds of free cursor images here at >> http://www.cursors-4u.com/
Congratulations: You've successfully customized you mouse cursor. Now visit your blog and see the magic.

From Editors Desk

We hope that this article helped you in customizing your mouse cursor in blogger. Share this tutorial with your friends and don't forget to subscribe us.

Add CSS3 Hover Animation Effect to Post Titles in Blogger

- 53 Comments
You might have seen hover effect on post titles on many blogs (especially in blogger blogs). Adding a CSS3 hover animation effect to post titles will increase your readership and it'll also attract your readers. One of our readers asked us that how to add a link nudge effect to post titles in blogger. So, today in this article we are going to learn how to add CSS3 hover animation effect to post titles in Blogger. How it works? Click on the demo button and move your mouse cursor over any post title to see how it works.

Add CSS3 Hover Animation Effect to Post Titles in Blogger

Step 1. Log in toy your Blogger Account
Step 2. Go to Template >> Edit HTML and search for the ]]></b:skin> tag
Step 3. Now copy the below code and paste it just above/before it

.post h2 {
margin:.1em 0 0;
padding:0 0 4px;
font-size:1.0em;
font-weight:normal;
line-height:2.5em;
color:#444;
font-family: Oswald, Serif;
}
.post h2 a, .post h2 a:visited, .post h2 strong {
display:block;
text-decoration:none;
color:#444;
font-size:2.0em;
font-weight:normal;
font-family: Oswald, Serif;
}
.post h2 strong, .post h2 a:hover {
color:#2aa4cf;
padding: 0px 00px 0px 10px;
-moz-transition: all 1s ease-out;
-o-transition: all 1s ease-out;
-webkit-transition: all 1s ease-out;
-ms-transition: all 1s ease-out;
transition: all 1s ease-out;
}

Step 4. Click on Save Template button
And you're done!

From Editors Desk

We hope this article helped you in learning How to Add CSS3 Hover Animation Effect to Post Titles in Blogger. Share this article with your friends and don't forget to subscribe us!

How to Add CSS3 Rounded Border Wrap in Blogger Templates

- 17 Comments
Adding Rounded Corners body wrapper to your blog is a great way to make your template more beautiful and attractive. By default, there is no border/rounded border wrap in blogger templates. By adding such styles you can make your blog look like professional blogs. This wrapper will make your blog to fit in every screen and it will also attract your visitors. So, today in this article we are going to share How to Add CSS3 Rounded Border Wrap in Blogger Templates.

Add CSS3 Rounded Border Wrap in Blogger Templates

Step 1. Log in to your Blogger Account
Step 2. Go to Template and click on Edit HTML Button
Step 3. Search for the ]]></b:skin> tag
Step 4. Copy the below code and paste it just above/before it

#bgtwrap {
    background: #ffffff;
    width: 965px;
    margin: 10px auto 5px auto;
    padding: 0;
    position: relative;
    border-right: 15px solid #333;
    border-left: 15px solid #333;
    border-top: 10px solid #333;
    border-bottom: 15px solid #333;
    -moz-border-radius:8px;
    -webkit-border-radius:8px;
    border-radius:8px;
    box-shadow: #333 0px 1px 3px;
    }

Step 5. Now search for <body> and paste the below code just below/after it

<div id='bgtwrap'>

Step 6. Finally, search for </body> and paste the below code just above it

</div>

Step 7. Click on Save Template Button
And you're done

Final Words

We hope this article helped you in learning How to Add CSS3 Rounded Border Wrap in Blogger Templates. Share this article with your friends and don't forget to subscribe us!

How to Create a Button/Badge for your Blog

- 3 Comments
You might have seen that many blogs and directories are using Buttons for their promotion. Blog buttons are becoming a very popular way to promote and link back to your blog. A badge in your blog's sidebar is really a good way to provide your readers something that they can use and display on their own blog to show that which blog's they read and it'll also increase your blog's traffic. It's really easy to create a button for promoting your blog. You can choose color, border, font style, background and text for your button by using this button maker tool. Using this tool is extremely easy and in this article we'll show you How to Create a Button/Badge for your Blog using Button maker tool.

How to Create a Button/Badge for your Blog

Go to this page and Customize you badge
Customization:
1- Choose a base color or keep it transparent
2- Choose a border color or keep it transparent
2- Select your Button Size and
4- Choose a vertical bar color or keep it transparent
5- For better look, write a small abbreviation of your blog or whatever you want (Left Side Text) and select its background and text color
6- Write your main keyword in the (Right Side Text) and select it background and text color
7- Click on Update >> Looks good so right click on the image and Save it
8- Upload it to blogger to get its link

How to Add this Badge to your Blog

<a href="Your-Blog-URL" ><img  border="0" src='Your-button-link' rel="Keyword"/></a>

1- Replace Your-Blog-URL with the url of your blog
2- Replace Your-button-link with the link of your button
3- Replace Keyword with your blog's keyword
Now to add this button to your blog Log in to your Blogger Account >> Layout >> Add a Gadget >> Scroll down the page and select HTML/JavaScript gadget from the list of gadgets. Paste the above code after customization in the empty HTML/JavaScript Box and click on Save Button.

From Editors Desk

I hope this article helped you in learning How to Create a Button/Badge for your Blog and How to Add it to your Blog. Share this article with your friends and don't forget to subscribe us. Take Care!

Add Rainbow Animation Effect to Links in Blogger

- 23 Comments
Got tired of Blogger's default link effect? Want to change your links hover effect? Don't worry, today we have a beautiful link effect for your blog. By using this link effect you can make the links on your blog change through different colors when the cursor is hovered over them. This effect works on JavaScript and it's really easy to implement this Rainbow Animation Link Effect to your blog. Follow the steps below to implement this Rainbow Animation Effect to your Blog.

How to Add Rainbow Animation Effect to Links in Blogger

Step 1. Log in to your Blogger Dashboard
Step 2. Go to Template >> Edit HTML >> and Search for the <head> tag
Step 3. Now Copy the below code and Paste it just below/after the <head> tag

<script type='text/javascript'>
//<![CDATA[
var rate = 20;
if (document.getElementById)
window.onerror=new Function("return true")
var objActive;  // The object which event occured in
var act = 0;    // Flag during the action
var elmH = 0;   // Hue
var elmS = 128; // Saturation
var elmV = 255; // Value
var clrOrg;     // A color before the change
var TimerID;    // Timer ID
if (document.all) {
document.onmouseover = doRainbowAnchor;
document.onmouseout = stopRainbowAnchor;
}
else if (document.getElementById) {
document.captureEvents(Event.MOUSEOVER | Event.MOUSEOUT);
document.onmouseover = Mozilla_doRainbowAnchor;
document.onmouseout = Mozilla_stopRainbowAnchor;
}
function doRainbow(obj)
{
if (act == 0) {
act = 1;
if (obj)
objActive = obj;
else
objActive = event.srcElement;
clrOrg = objActive.style.color;
TimerID = setInterval("ChangeColor()",100);
}
}
function stopRainbow()
{
if (act) {
objActive.style.color = clrOrg;
clearInterval(TimerID);
act = 0;
}
}
function doRainbowAnchor()
{
if (act == 0) {
var obj = event.srcElement;
while (obj.tagName != 'A' && obj.tagName != 'BODY') {
obj = obj.parentElement;
if (obj.tagName == 'A' || obj.tagName == 'BODY')
break;
}
if (obj.tagName == 'A' && obj.href != '') {
objActive = obj;
act = 1;
clrOrg = objActive.style.color;
TimerID = setInterval("ChangeColor()",100);
}
}
}
function stopRainbowAnchor()
{
if (act) {
if (objActive.tagName == 'A') {
objActive.style.color = clrOrg;
clearInterval(TimerID);
act = 0;
}
}
}
function Mozilla_doRainbowAnchor(e)
{
if (act == 0) {
obj = e.target;
while (obj.nodeName != 'A' && obj.nodeName != 'BODY') {
obj = obj.parentNode;
if (obj.nodeName == 'A' || obj.nodeName == 'BODY')
break;
}
if (obj.nodeName == 'A' && obj.href != '') {
objActive = obj;
act = 1;
clrOrg = obj.style.color;
TimerID = setInterval("ChangeColor()",100);
}
}
}
function Mozilla_stopRainbowAnchor(e)
{
if (act) {
if (objActive.nodeName == 'A') {
objActive.style.color = clrOrg;
clearInterval(TimerID);
act = 0;
}
}
}
function ChangeColor()
{
objActive.style.color = makeColor();
}
function makeColor()
{
// Don't you think Color Gamut to look like Rainbow?
// HSVtoRGB
if (elmS == 0) {
elmR = elmV;    elmG = elmV;    elmB = elmV;
}
else {
t1 = elmV;
t2 = (255 - elmS) * elmV / 255;
t3 = elmH % 60;
t3 = (t1 - t2) * t3 / 60;
if (elmH < 60) {
elmR = t1;  elmB = t2;  elmG = t2 + t3;
}
else if (elmH < 120) {
elmG = t1;  elmB = t2;  elmR = t1 - t3;
}
else if (elmH < 180) {
elmG = t1;  elmR = t2;  elmB = t2 + t3;
}
else if (elmH < 240) {
elmB = t1;  elmR = t2;  elmG = t1 - t3;
}
else if (elmH < 300) {
elmB = t1;  elmG = t2;  elmR = t2 + t3;
}
else if (elmH < 360) {
elmR = t1;  elmG = t2;  elmB = t1 - t3;
}
else {
elmR = 0;   elmG = 0;   elmB = 0;
}
}
elmR = Math.floor(elmR).toString(16);
elmG = Math.floor(elmG).toString(16);
elmB = Math.floor(elmB).toString(16);
if (elmR.length == 1)    elmR = "0" + elmR;
if (elmG.length == 1)    elmG = "0" + elmG;
if (elmB.length == 1)    elmB = "0" + elmB;
elmH = elmH + rate;
if (elmH >= 360)
elmH = 0;
return '#' + elmR + elmG + elmB;
}
//]]>
</script>

Step 4. Hit the Save Template button
And you're done...

From Editors Desk

I hope this articled helped you in learning How to Add Rainbow Animation Effect to Links in Blogger. Share this article with your friends. 

How to Create a Tooltip For Hyperlink in Blogger

- 2 Comments
What is a tooltip? A tooltip is a text in box which is displayed over a hyperlink, when you move your mouse cursor on the link. Tooltips are used for displaying extra text over links. Tooltips can be used for all sorts of things i.e descriptions, definitions, word meanings etc. You might have seen different types of tooptips on many blogs. So, today we are going to share a simple and beautiful tooltip for your blog. In the image below "Text to Show" is your text and link and the text in the blue box just above it is your tooltip.

How to Create a Tooltip For Hyperlink in Blogger

Step 1. Log in to your Blogger Dashboard
Step 2. Go to Template and Click on Edit HTML button
Step 3. Now search for the ]]></b:skin> tag
Step 4. Copy the below code and paste it just above/before the ]]></b:skin> tag

/* Tooltip Provided by blogolect.blogspot.com */
a:link,
a:visited {
position:relative;
}
.bgttooltip {
width:300px;
position:absolute;
bottom:100%;
margin:0 0 7px 0;
padding:5px;
font-family:Verdana,sans-serif;
font-size:13px;
font-weight:normal;
font-style:normal;
text-align:left;
text-decoration:none;
text-shadow:0 1px 0 rgba(255,255,255,0.3);
line-height:1.5;
border:solid 1px;
-moz-border-radius:0px;
-webkit-border-radius:0px;
border-radius:0px;
-moz-box-shadow:
0 1px 2px rgba(0,0,0,0.3),
0 1px 2px rgba(255,255,255,0.5) inset;
-webkit-box-shadow:
0 1px 2px rgba(0,0,0,0.3),
0 1px 2px rgba(255,255,255,0.5) inset;
box-shadow:
0 1px 2px rgba(0,0,0,0.3),
0 1px 2px rgba(255,255,255,0.5) inset;
cursor:default;
display:block;
visibility:hidden;
opacity:0;
z-index:999;
-moz-transition:all 0.4s linear;
-webkit-transition:all 0.4s linear;
-o-transition:all 0.4s linear;
transition:all 0.4s linear;
color:#2B2B2B;
background:#2aa4cf;
background:-moz-linear-gradient(top,rgba(192,192,192,0.8),rgba(192,192,192,1));
background: #2aa4cf;
border-color:#2aa4cf;
}
.bgttooltip:before,
.bgttooltip:after
{
width:0;
height:0;
position:absolute;
bottom:0;
margin:0 0 -20px -10px;
border:solid 10px;
border-color:transparent;
display:table-cell;
content:"";
}
.bgttooltip:before
{
margin:0 0 -24px -12px;
border:solid 12px;
border-color:transparent;
z-index:-1;
}
a:hover .bgttooltip
{
text-decoration:none;
visibility:visible;
opacity:1;
-moz-transition:all 0.2s linear;
-webkit-transition:all 0.2s linear;
-o-transition:all 0.2s linear;
transition:all 0.2s linear;
}
.bgttooltip,
.bgttooltip.left {
left:0;
right:0;
}
.bgttooltip:before,
.bgttooltip:after,
.bgttooltip.left:before,
.bgttooltip.left:after {
left:40px;
right:auto;
}
.bgttooltip:before {
border-top-color:#2aa4cf;
}
.bgttooltip:after {
border-top-color:#2aa4cf;
}
/* Tooltip Provided by blogolect.blogspot.com */

Step 5. Click on Save Template button

How to Use this Tooltip for Hyperlink

In the post editor click HTML and paste the following code where you want to use it

<a href="Your-Link-URL">Text to Show<span class="bgttooltip">Your Tooltip Text</span></a> 

Customization:
  • Replace Your-Link-URL with your URL 
  • Replace Text to Show with the text you want to show before hover
  • Replace Your Tooltip Text with the text you want to show in tooptip on mouse hover
Step 6. Click on Publish button
And you're done!!

How to Make a Gadget visible only to blog Administrator

- 1 Comment
Sometimes we want to make some gadgets visible only to us in blogger. A traffic counter, or any gadget while we are customizing it, we want to hide all these types of widgets from our visitors, until they are fully customized. So, if you don't know that how to hide a gadget from your visitors, then don't worry, today in this tutorial we'll show you How to Make a Gadget visible only to blog Administrator. The procedure is simple and you just have to add two lines to hide a specific widget from your visitors.

How to Make a Gadget visible only to blog Administrator 

Step 1. Log in to your Blogger Account
Step 2. Go to Template and click on Edit HTML
Step 3. Now search (Ctrl + F) for the widget code that you want to hide
For Example, my widget code is

<b:widget id='HTML8' locked='false' title='' type='HTML'>
            <b:includable id='main'>
  <!-- only display title if it's non-empty -->
  <b:if cond='data:title != &quot;&quot;'>
    <h2 class='title'><data:title/></h2>
  </b:if>
  <div class='widget-content'>
    <data:content/>
  </div>

  <b:include name='quickedit'/>             
</b:includable>
          </b:widget>

To hide this widget from your users add <span class='item-control blog-admin'> after/below <b:includable id='main'> and </span> before/above </b:includable> tag. Check the example below:

<b:widget id='HTML8' locked='false' title='' type='HTML'>
            <b:includable id='main'>
<span class='item-control blog-admin'>
  <!-- only display title if it's non-empty -->
  <b:if cond='data:title != &quot;&quot;'>
    <h2 class='title'><data:title/></h2>
  </b:if>
  <div class='widget-content'>
    <data:content/>
  </div>

  <b:include name='quickedit'/>
  </span>           
</b:includable>
          </b:widget>

Step 4. Now click on Save template button
Congratulations: Now this widget is hidden from your visitors.
Note: Sometimes the widget codes are not expanded and are in the form of folds. So to expand the widget code click on the sideway arrow next to the widget's id.
And you're done!

How to Create a Full Widget Page and Remove Sidebar in Blogger

- 2 Comments
Have you ever thought about removing the sidebar and creating a full width page in blogger? If you have visited our About Us and Contact page then you may have observed the difference between normal pages and these pages. The difference is that these pages are of full width and with no sidebar, which gives them an eye catching look. So if you are thinking to create a full width page without sidebar, then you're at the right place, today in this article we'll show you How to Create a Full Widget Page and Remove Sidebar in Blogger.

How to Create a Full Widget Page and Remove Sidebar in Blogger

Step 1. Log in to your Blogger Account
Step 2. Go to Pages and Create a New Page
Step 3. Now switch the page editor to HTML by Clicking on HTML tab
Step 4. Copy the below code and paste it in the HTML tab

<style>
#sidebar-wrapper, #midsidebar-wrapper, .gapad2, .blog-pager, .post-header-line-1, .post-footer { display:none !important;} #main-wrapper { width:99%!important;} .post { width:99%!important; }
</style>

  • Change the width 99% according to your needs or you can also use pixels (960) instead of it. 
Step 5. Click on Publish button and check your page of full width and without sidebar.

Final Words

We hope this article helped you in learning How to Create a Full Widget Page and Remove Sidebar in Blogger. Share it with your friends and don't forget to subscribe us!

How to Submit your Sitemap to Google Webmaster Tools

- 4 Comments
Started a New Blogger Blog? Want to rank it better in search results? Without optimization it is not possible? There are hundreds of free SEO tools to optimize your blog. But the best free tool that i prefer is Google Webmaster tools. Google Webmaster tool gives all the information about your appearance in search results. In order to make your blog appear in Google search results it is important to submit your blog's sitemap to Google webmaster tools. What happens on submitting your sitemap to Google? In simple words, submitting your sitemap to Google means to notify Google about your blog posts. On submitting your sitemap to Google, it start sending bots to your blog, and crawling your blog pages thus your blog starts appearing in Google search results. So today we are going to learn that How to Submit your Sitemap to Google Webmaster Tools. Also Read How to Submit your Blog to Google Webmaster Tools

How to Submit your Sitemap to Google Webmaster Tools

Step 1. First of all, you've to Submit your site to Google webmaster tools
Step 2. After step 1 go to Webmaster tools homepage and select your site
Step 3. In the left sidebar click on Crawl and then select Sitemaps
Step 4. Now click on Add/Test Sitemap button and type sitemap.xml in the empty field
Step 5. Click on submit sitemap and refresh the page

From Editors Desk

We hope this article helped you in learning How to Submit your Sitemap to Google Webmaster Tools. Share it with your friends and don't forget to subscribe us!

How to Add Keyboard Keys Effect to your Text in Blogger

- 2 Comments
Unique design is necessary for a blog. To get organic traffic and user attention you need to develop the blog user friendly and search engine friendly as well. It is possible only if your blog's design is simple, attractive and easy to navigate. Sometimes we need to mention keyboard shortcuts in our blog posts. So, if you add keyboard keys effect instead of simple text, it will impress your visitors and they'll get more interested in your blog. Oh sorry, let me tell you that what is Keyboard Keys Effect? In simple words, keyboard keys effect is just normal text, styled using CSS. In this tutorial, we are going to show you How to Add Keyboard Keys Effect to your Text in Blogger.

How to Add Keyboard Keys Effect to your Text in Blogger

Step 1. Log in to your Blogger Account
Step 2. Go to Template and Click on Edit HTML Button
Step 3. Now search Ctrl + F for the ]]></b:skin> tag and paste Ctrl + V the below code just above/before it

kbd{
border:1px solid gray;
font-size:1.2em;
box-shadow:1px 0 1px 0 #eee, 0 2px 0 2px #ccc, 0 2px 0 3px #444;
-webkit-border-radius:3px;
-moz-border-radius:3px;
border-radius:3px;
margin:2px 3px;
padding:1px 5px;
}

Step 4. Click on Save Template Button

How to Use Keyboard Keys Effect

To use this Keyboard Keys Effect to your text, you need to add <kbd> and </kbd> tags to your text. See the below example to see how it works:

<kbd> This is my Text </kbd>

Create a New Post and switch it to HTML by clicking on HTML tab in the Post Editor
Example 1.
For Ctrl + C

<kbd>Ctrl</kbd> + <kbd>C</kbd>

Result:

Ctrl + C

Example 2.
For Ctrl + F

<kbd>Ctrl</kbd> + <kbd>F</kbd>

Result:

Ctrl + F

From Editors Desk

We hope that this article helped you in learning How to Add Keyboard Keys Effect to your Text in Blogger and How to use this effect in blogger. Share this article with your friends and don't forget to subscribe us!

How to Customize Blockquote in Blogger

- 7 Comments
First of all let me tell you that What is Blockquote? Blockquotes are sections of text which are used to highlight quotes from other text or simply a blockquote is used to highlight a text to make it different from other text on the page. Blockquotes are used to draw attention of your readers to particular parts of your blog or if you're a blogger then you can use blockquotes for highlighting code snippets of widgets/CSS codes. Whatever your purpose, using blockquotes is a perfect way to draw your readers attention. So today, in this tutorial we'll show you How to Customize Blockquote in Blogger. Check the image below to see how this blockquote looks that we are going to share today.

How to Customize Blockquote in Blogger

Step 1. Log in to your Blogger Account
Step 2. Go to Template >> Backup your Template and click on Edit HTML
Step 3. Search for .post blockquote and delete the code with all its occurrences. In most templates code looks like this

.post-body blockquote { blaa blaa blaa } 

If your couldn't find it then no problem, its ok
Step 4. Now search for ]]></b:skin> and paste the following code just above/before it

.post blockquote{background:#ddd;border-left:1px solid #333;border-bottom:17px solid #333;border-top:1px solid #333;border-right:1px solid #333; margin-left:20px}
.post blockquote p{padding:10px}

Step 5. Click on Save Template button
And you're done!

How to Use Blockquote

Using blockquote is extremely easy, from the post editor type or paste whatever you want. Select the text/code that you want to show in blockquote and click on Quote tool.

From Editors Desk

We hope this article helped you in learning How to Customize Blockquote in Blogger. Share it with your friends and don't forget to subscribe us!

Add Page Peel Effect with jQuery in Blogger

- 4 Comments
Page Peel effect is actually a page flip effect, when you move your cursor on over it, it flip and shows that whats behind it. There are many ways for adding this effect, and today we are going to share one of them. Just like other Peel effect widgets, it would also appear at the top right corner of your blog and whenever your visitors would move their cursor over the top right corner of your website, it would display the RSS Image with its link. Check the following screenshot to see how it works.

How to Add Page Peel Effect

Step 1. Log in to your Blogger Dashboard
Step 2. Go to Template >> Edit HTML >> Search for the <head> tag
Step 3. Now Copy and Paste the following code below/after <head> tag
Note: If your blog already have jQuery plugin, then ignore this step

<script src='http://ajax.googleapis.com/ajax/libs/jquery/1.7.1/jquery.min.js' type='text/javascript'/>

Step 4. Now search for </head> tag and paste the following piece of code just above/before it

<style type='text/css'>
img { behavior: url(iepngfix.htc) }
#pageflip {
position: absolute;
right: 0; top: 0;
float: right;
}
#pageflip img {
width: 50px; height: 52px;
z-index: 99;
position: absolute;
right: 0; top: 0;
-ms-interpolation-mode: bicubic;
}
#pageflip .back-img {
width: 50px; height: 50px;
overflow: hidden;
position: absolute;
right: 0; top: 0;z-index:98;
background: url(https://blogger.googleusercontent.com/img/b/R29vZ2xl/AVvXsEihz3q3h2zCv7CfnjbVW3Qf06uFaWlBrVKQSLud-kTbP9TPVdOMl1g7fTyj6E6ASKoEspj3a7ZqUjX_xBvzlWGaVo3vreRS5imzfG9AUjpKFB48TUUtXaL6-h_4D9H2n7XIcN10kyAVp8A/s1600/mini_rss.png) no-repeat right top #fff;
}
</style><a href='http://blogolect.blogspot.com'><img src='https://blogger.googleusercontent.com/img/b/R29vZ2xl/AVvXsEiYOOskp1gqv0QqtqnuJnHX00nJ2WgEcdPi3HTTJRQtY31Q_GnKf8VljKvkRF-ZKbacVAUdzly0Rqx4dYx0RwJQEwXMFkK_k3Lym-kF-bdd9tE-up7AmsRmTYo7584cmbDP0M8LZ6Cg26I/s1600/1x1juice.png'/></a><script type='text/javascript'>
$(document).ready(function(){
//Page Flip on hover
$(&quot;#pageflip&quot;).hover(function() {
$(&quot;#pageflip img , .back-img&quot;).stop()
    .animate({
    width: &#39;307px&#39;,
    height: &#39;319px&#39;
    }, 500);
    } , function() {
    $(&quot;#pageflip img&quot;).stop()
    .animate({
    width: &#39;50px&#39;,
    height: &#39;52px&#39;
    }, 220);
$(&quot;.back-img&quot;).stop()
    .animate({
    width: &#39;50px&#39;,
    height: &#39;50px&#39;
    }, 200);
});
});
</script>

Step 5. Now search for <body> tag and paste the following piece of code just after the close tag '>'

<div id='pageflip'>
<a href='http://feeds.feedburner.com/blogolect'><img alt='Blogolect' src='https://blogger.googleusercontent.com/img/b/R29vZ2xl/AVvXsEjoRzDkdCzX1NFeCnXV6pyc0eTACmDS0ca4pqthkuDpAt0MSHP0z6w7t7fDrqgu8A_bku1H1trfd8GtlT4t4slFFTziYEeqelRwuYdIBKDAx3yKyOnS4jMjaq4THkx2JAwdNQisWuiQzUBN/s1600/page_flip.png'/></a>
<div class='back-img'/>
</div> 
  • Replace http://feeds.feedburner.com/blogolect with your Link
  • Replace https://blogger.googleusercontent.com/img/b/R29vZ2xl/AVvXsEihz3q3h2zCv7CfnjbVW3Qf06uFaWlBrVKQSLud-kTbP9TPVdOMl1g7fTyj6E6ASKoEspj3a7ZqUjX_xBvzlWGaVo3vreRS5imzfG9AUjpKFB48TUUtXaL6-h_4D9H2n7XIcN10kyAVp8A/s1600/mini_rss.png with your Image URL or keep it default
Step 6. Hit the Save Template Button
And you're done.

How to Schedule Posts in Blogger for Auto Publish

- 1 Comment
Updating your Blog regularly is not only important for SEO but also for Alexa Ranking. We should update our blog daily in order to maintain our traffic which we're receiving currently and our ranking on the web. And one more thing that updating your blog daily on the same time also increases you ranking and traffic. But sometimes we don't have time to publish the post or we are unable to update our blog at accurate time. So, the solution of this problem is to schedule posts. You can also schedule you posts when you are busy in your exams or other occasion. Today in this article we'll learn How to Schedule Posts in Blogger for Auto Publish in Blogger.

How to Schedule Posts for Auto Publish

Step 1. From your Blogger Dashboard open or create a new post and write your complete post
Step 2. From the Post Editor's sidebar click on the Schedule option >> Set date and time 
Step 3. Now you've to set the exact date and time on which you want to publish that post.
Step 4. Click on Done and you're Done
Congratulations:
Now you post will be automatically publish on the time that you've set.

How to Find forgotten email address of your Blogger Blog

- 3 Comments
If you don't remember which email address you used to sign up and you don't remember which email address you used to create your Blogger blog OR If you've forgotten the email address you use to sign in to Blogger or your blog's URL. Blogger all of its features also provides you to find your forgotten email address or your blog's URL. Finding forgotten email address of your Blogger Blog is extremely easy all you have to do is just enter the URL of the blog you're trying to gain access. Follow the steps below to Find forgotten email address of your Blogger Blog.

How to a Find forgotten email address

To find your forgotten email address go to www.blogger.com/forgot.g a page will open.
On that page enter your blog name in the box and hit the Lookup button. After that Blogger will send you a message on the email associated with the blog you've entered.

From Editors Desk

We hope that this article helped you to find you forgotten email address. Give us your Feedback and don't forget to subscribe us via email.

How to Add Arrow Key Page Navigation to Blogger

- 6 Comments
Default Blogger template displays older and newer page link for navigation that appears at the bottom on post pages. If you are tired of using this old navigation, so today we've another page navigation system called Keyboard Arrow Key Navigation. You might have seen this feature on many blogs. This navigation allow you visitors to navigate your blog using the keyboard arrow keys i.e Left Arrow or Right Arrow. This navigation is simple, clean and it's really easy to implement this navigation on your blog. Today, in this article we'll show you How to Add Arrow Key Page Navigation to Blogger.

How to Works

It works on every page Homepage, Archive Pages and also on Post Pages. If you are on homepage the arrow keys will navigate for older and newer posts, and if you are on Post page then the keys will help you to navigate for Next or Previous Posts.

How to Add Arrow Key Page Navigation to Blogger

Step 1. Log in to your Blogger Dashboard
Step 2. Go to Layout >> Add a Gadget >> A pop up will open containing gadgets, scroll down and select HTML/JavaScript Gadget from the list of gadgets
Step 4. Copy the below code and paste it in the Empty Widget box

<script type='text/javascript'>
window.onload = function()
{
document.onkeyup = function(event)
{
if (document.activeElement.nodeName == 'TEXTAREA' || document.activeElement.nodeName == 'INPUT') return;
event = event || window.event;
switch(event.keyCode)
{
case 37:
var newerLink = document.getElementById('Blog1_blog-pager-newer-link');
if(newerLink !=null) window.location.href = newerLink.href;
break;
case 39:
var olderLink = document.getElementById('Blog1_blog-pager-older-link');
if(olderLink!=null) window.location.href = olderLink.href;
}
};
};
</script>

Step 5. Hit the Save Button
And You're done!

How to Stop Tracking your own Pageviews in Blogger

- No Comments
Blogger Provides its default Pageview tracker to its users. It provides you all the information about your pageviews that which system or browser your visitors are using, from which country you are getting most of your visitors etc. But the problem is that it also tracks your own pageviews. As a Blog owner, you might visit your blog 20 to 30 times a day and during your visits you might visit your blog thousands of times, so it gets difficult to get your accurate number of visitors. To get accurate statistics of your blog, you have to stop tracking your own pageviews. So, today in this article we are going to learn that How to Stop Tracking your own Pageviews in Blogger.

Stop Tracking your own Pageviews in Blogger

Log in to your Blogger Dashboard. Select a Blog >> Stats >> Overview and Click on Don't track your own pageviews button under your Blog's Pageviews statistics. A Popup will open and from that popup make on Don't track your own pageviews.
And hit the Save button.
Note: Now blogger will stop tracking your own pageviews for the browser you are using at the moment but it'll track your pageviews when you visit your blog from another browsers. If you've cleared your browser cookies then you have to repeat the same steps again :)
We hope this tip have helped you to Stop Tracking your own Pageviews in Blogger. Share this Article with your friends and don't forget to subscribe us.

How to Disable Right Click on your Blog to Prevent Copy/Paste

- No Comments
Everyday tons of content is being published on the internet via different networks like Blogger, Wordpress etc. If you are a blog owner and you publish all the great and unique content on your blog then its important for you to make your content safe. Blogger always wanted to prevent their blog's content from copying. Suppose you work all the day and night to publish some unique content on your blog and someone just copies your content on his/her blog and publishes it. So, today we are going to learn How to Disable Right Click on your Blog to Prevent Copy/Paste.

Disable Right Click on your Blog to Prevent Copy/Paste

Step 1. Log in to your Blogger Dashboard
Step 2. Go to Layout >> Click on Add a Gadget and select HTML/JavaScript Gadget from the list of Gadgets
Step 3. Now Copy the below code and Paste it in the HTML/JavaScript Widget Box


<script language='JavaScript1.2'>
function disableselect(e){
return false
}
function reEnable(){
return true
}
document.onselectstart=new Function ("return false")
if (window.sidebar){
document.onmousedown=disableselect
document.onclick=reEnable
}
</script>

Step 4. Hit the Save Button
That's it :)
Congratulations: You've successfully Disabled Right Click on your Blog and Now no one can copy/paste from your blog.

How to Embed Instagram Photos Gallery in Blogger Blog

- 20 Comments
Instagram is the best photo sharing app to share your photos with your friends and family. This app helps you to capture, share and to socialize your images with your friends. By default, you cannot access to instagram using your computer or laptops. You can only access to instagram using iPhone or android phones. So, if you are a lucky Instagrammer and you want to show your images on your blogger blog then don't worry, its easy to do it. Today in this article, we are going to share an article on How to Embed Instagram Photos Gallery in Blogger Blog.

How to Embed Instagram Photos Gallery in Blogger Blog

Step 1. Visit this page :- http://snapwidget.com/#getstarted
Step 2. Scroll down the page, you'll see a plenty of options like Username, Hashtag, Widget Type, thumbnail Size etc.
Step 3. Enter your username in the Username field and make the other necessary changes, it depends on you that how you want to customize your widget.
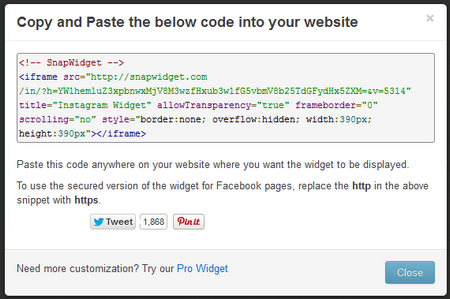
Step 4. After customization, click on Get Widget button, a pop up window will open containing your widget code
Step 5. Now to add it to blogger. Go to your Blogger Dashboard >> Create a New Post >> click on HTML and paste that code in the HTML tab. Publish your posts and see the widget in live action

From Editors Desk 

We hope this tutorial helped you in leaning How to Embed Instagram Photos Gallery in Blogger Blog. Share this article with your friends and don't forget to subscribe us.