Don't Miss

Latest Posts
Browsing Category "Blogging Tips"

How to Schedule Posts in Blogger for Auto Publish

- 1 Comment
Updating your Blog regularly is not only important for SEO but also for Alexa Ranking. We should update our blog daily in order to maintain our traffic which we're receiving currently and our ranking on the web. And one more thing that updating your blog daily on the same time also increases you ranking and traffic. But sometimes we don't have time to publish the post or we are unable to update our blog at accurate time. So, the solution of this problem is to schedule posts. You can also schedule you posts when you are busy in your exams or other occasion. Today in this article we'll learn How to Schedule Posts in Blogger for Auto Publish in Blogger.

How to Schedule Posts for Auto Publish

Step 1. From your Blogger Dashboard open or create a new post and write your complete post
Step 2. From the Post Editor's sidebar click on the Schedule option >> Set date and time 
Step 3. Now you've to set the exact date and time on which you want to publish that post.
Step 4. Click on Done and you're Done
Congratulations:
Now you post will be automatically publish on the time that you've set.

How to Find forgotten email address of your Blogger Blog

- 3 Comments
If you don't remember which email address you used to sign up and you don't remember which email address you used to create your Blogger blog OR If you've forgotten the email address you use to sign in to Blogger or your blog's URL. Blogger all of its features also provides you to find your forgotten email address or your blog's URL. Finding forgotten email address of your Blogger Blog is extremely easy all you have to do is just enter the URL of the blog you're trying to gain access. Follow the steps below to Find forgotten email address of your Blogger Blog.

How to a Find forgotten email address

To find your forgotten email address go to www.blogger.com/forgot.g a page will open.
On that page enter your blog name in the box and hit the Lookup button. After that Blogger will send you a message on the email associated with the blog you've entered.

From Editors Desk

We hope that this article helped you to find you forgotten email address. Give us your Feedback and don't forget to subscribe us via email.

How to Add Arrow Key Page Navigation to Blogger

- 6 Comments
Default Blogger template displays older and newer page link for navigation that appears at the bottom on post pages. If you are tired of using this old navigation, so today we've another page navigation system called Keyboard Arrow Key Navigation. You might have seen this feature on many blogs. This navigation allow you visitors to navigate your blog using the keyboard arrow keys i.e Left Arrow or Right Arrow. This navigation is simple, clean and it's really easy to implement this navigation on your blog. Today, in this article we'll show you How to Add Arrow Key Page Navigation to Blogger.

How to Works

It works on every page Homepage, Archive Pages and also on Post Pages. If you are on homepage the arrow keys will navigate for older and newer posts, and if you are on Post page then the keys will help you to navigate for Next or Previous Posts.

How to Add Arrow Key Page Navigation to Blogger

Step 1. Log in to your Blogger Dashboard
Step 2. Go to Layout >> Add a Gadget >> A pop up will open containing gadgets, scroll down and select HTML/JavaScript Gadget from the list of gadgets
Step 4. Copy the below code and paste it in the Empty Widget box

<script type='text/javascript'>
window.onload = function()
{
document.onkeyup = function(event)
{
if (document.activeElement.nodeName == 'TEXTAREA' || document.activeElement.nodeName == 'INPUT') return;
event = event || window.event;
switch(event.keyCode)
{
case 37:
var newerLink = document.getElementById('Blog1_blog-pager-newer-link');
if(newerLink !=null) window.location.href = newerLink.href;
break;
case 39:
var olderLink = document.getElementById('Blog1_blog-pager-older-link');
if(olderLink!=null) window.location.href = olderLink.href;
}
};
};
</script>

Step 5. Hit the Save Button
And You're done!

How to Stop Tracking your own Pageviews in Blogger

- No Comments
Blogger Provides its default Pageview tracker to its users. It provides you all the information about your pageviews that which system or browser your visitors are using, from which country you are getting most of your visitors etc. But the problem is that it also tracks your own pageviews. As a Blog owner, you might visit your blog 20 to 30 times a day and during your visits you might visit your blog thousands of times, so it gets difficult to get your accurate number of visitors. To get accurate statistics of your blog, you have to stop tracking your own pageviews. So, today in this article we are going to learn that How to Stop Tracking your own Pageviews in Blogger.

Stop Tracking your own Pageviews in Blogger

Log in to your Blogger Dashboard. Select a Blog >> Stats >> Overview and Click on Don't track your own pageviews button under your Blog's Pageviews statistics. A Popup will open and from that popup make on Don't track your own pageviews.
And hit the Save button.
Note: Now blogger will stop tracking your own pageviews for the browser you are using at the moment but it'll track your pageviews when you visit your blog from another browsers. If you've cleared your browser cookies then you have to repeat the same steps again :)
We hope this tip have helped you to Stop Tracking your own Pageviews in Blogger. Share this Article with your friends and don't forget to subscribe us.

How to Disable Right Click on your Blog to Prevent Copy/Paste

- No Comments
Everyday tons of content is being published on the internet via different networks like Blogger, Wordpress etc. If you are a blog owner and you publish all the great and unique content on your blog then its important for you to make your content safe. Blogger always wanted to prevent their blog's content from copying. Suppose you work all the day and night to publish some unique content on your blog and someone just copies your content on his/her blog and publishes it. So, today we are going to learn How to Disable Right Click on your Blog to Prevent Copy/Paste.

Disable Right Click on your Blog to Prevent Copy/Paste

Step 1. Log in to your Blogger Dashboard
Step 2. Go to Layout >> Click on Add a Gadget and select HTML/JavaScript Gadget from the list of Gadgets
Step 3. Now Copy the below code and Paste it in the HTML/JavaScript Widget Box


<script language='JavaScript1.2'>
function disableselect(e){
return false
}
function reEnable(){
return true
}
document.onselectstart=new Function ("return false")
if (window.sidebar){
document.onmousedown=disableselect
document.onclick=reEnable
}
</script>

Step 4. Hit the Save Button
That's it :)
Congratulations: You've successfully Disabled Right Click on your Blog and Now no one can copy/paste from your blog.

How to Embed Instagram Photos Gallery in Blogger Blog

- 20 Comments
Instagram is the best photo sharing app to share your photos with your friends and family. This app helps you to capture, share and to socialize your images with your friends. By default, you cannot access to instagram using your computer or laptops. You can only access to instagram using iPhone or android phones. So, if you are a lucky Instagrammer and you want to show your images on your blogger blog then don't worry, its easy to do it. Today in this article, we are going to share an article on How to Embed Instagram Photos Gallery in Blogger Blog.

How to Embed Instagram Photos Gallery in Blogger Blog

Step 1. Visit this page :- http://snapwidget.com/#getstarted
Step 2. Scroll down the page, you'll see a plenty of options like Username, Hashtag, Widget Type, thumbnail Size etc.
Step 3. Enter your username in the Username field and make the other necessary changes, it depends on you that how you want to customize your widget.
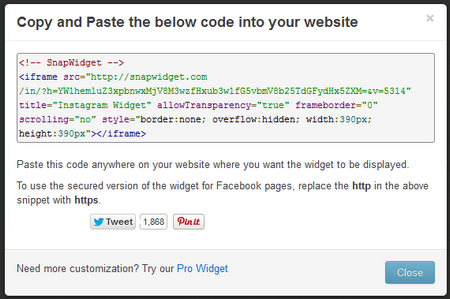
Step 4. After customization, click on Get Widget button, a pop up window will open containing your widget code
Step 5. Now to add it to blogger. Go to your Blogger Dashboard >> Create a New Post >> click on HTML and paste that code in the HTML tab. Publish your posts and see the widget in live action

From Editors Desk 

We hope this tutorial helped you in leaning How to Embed Instagram Photos Gallery in Blogger Blog. Share this article with your friends and don't forget to subscribe us.

How to Add Alexa Ranking Widget to Blogger

- 7 Comments
Alexa is a Web Information Company. Just like Google page rank, Alexa rank is also an important factor that shows the popularity of a blog. Advertisers for displaying their ads also check your page rank and then alexa rank. It means if you want to get your blog approved by ads selling networks/advertisers then alexa rank is also important. Alexa offers a widget that you can implement to your blog to show your alexa rank to your users and it'll also improve your alexa rank. So, in this post we are going to share that How to Add Alexa Ranking Widget to Blogger.

How to Add Alexa Ranking Widget to Blogger

Step 1. Go to Alexa Traffic Widget Page
Step 2. Choose a widget type i.e Stats button, Rank button or Alexa Traffic Graph, and enter your Blog's URL in the box.
Step 3. Click on Build Widget button.
Step 4. You'll see 3 different types of codes with their previews, copy the one you like
Step 5. Now Go to your Blogger Dashboard >> Layout >> Add a Gadget and select HTML/JavaScript gadget from the list of gadgets
Step 6. Paste that code in the HTML/Javascript box and click on Save Button
That's it...

From Editors Desk

We hope this article helped you in learning How to Add Alexa Ranking Widget to Blogger. Share this article with your friends and don't forget to subscribe us!

Add Spinning/Rotating Effect to Images in Blogger

- 2 Comments
Recently we've shared Add Round Hover Effect to Images of your Blogger Blog Posts , Add Hover Effect to Images of your Blogger Blog Posts , Add Zoom Effect to Images on Mouse Hover in Blogger and today we've another image effect for you. This effect rotates the image to 360 degree when you move your mouse cursor on the image. To see how this hover effect works move your mouse cursor on the image below.

How to Add Spinning/Rotating Effect to Images

Step 1. Log in to your Blogger Dashboard
Step 2. Go to Template >> Edit HTML and Search for the following tag

]]></b:skin>

Step 3. Copy the below code and Paste it just above/before it

.spineffect img {
 /* Spinning/Rotating Effect for Images By www.blogolect.blogspot.com */
    -moz-transition: all 0.8s ease-in-out;
    -webkit-transition: all 0.8s ease-in-out;
    -o-transition: all 0.8s ease-in-out;
    -ms-transition: all 0.8s ease-in-out;
    transition: all 0.8s ease-in-out;
}

.spineffect img:hover {
    -moz-transform: rotate(360deg);
    -webkit-transform: rotate(360deg);
    -o-transform: rotate(360deg);
    -ms-transform: rotate(360deg);
    transform: rotate(360deg);
  • You can change the degree at which you want to rotate image by changing degree value 360
Step 4. Hit the Save Template button

How to Use this Effect on Images

To use this effect in you posts then in the post editor after uploading your image switch to HTML look for the image class. The default image class is <div class="seperator". Now replace seperator to spineffect in the post editor and you're done.
If you want to use effect in other part of your blog then use the following tag and replace IMAGE-URL with the image URL.

<a class="spineffect" href="IMAGE-URL" target="_blank"><img src="IMAGE-URL" /></a>

From Editors Desk

I hope this tutorial helped you in learning How to Add Spinning/Rotating Effect to Images in Blogger. Share this article with your friends and don't forget to subscribe us!