Don't Miss

Latest Posts
Browsing Category "Beginner's Guide"

4 Cool CSS Tricks to Spice Up your Blog

- 5 Comments
No doubt! Every Blogger loves CSS. CSS is used for styling webpages, customizing colors, layout etc. Almost everything that we do for styling our blog is based on CSS. There are thousands of amazing things that you can do with CSS. Even if you've been learning CSS for many years, you probably still come to new things, new values, new effects/tricks and properties you've never used.
4 Cool CSS Tricks to Spice Up your Blog
So, lets learn some new CSS tricks today, that you can use to spice up your blog. In this tutorial we'll share 4 Cool CSS tricks that you might find useful.

3D Text

Create a 3D effect for your text using this simple CSS code. Add this CSS code to the CSS code of that element which you want to make 3D. You can make it look more cool by changing its color.

text-shadow:   1px 0px #eee, 0px 1px #ccc,
                      2px 1px #eee, 1px 2px #ccc,
                      3px 2px #eee, 2px 3px #ccc,
                      4px 3px #eee, 3px 4px #ccc,
                      5px 4px #eee, 4px 5px #ccc,
                      6px 5px #eee, 5px 6px #ccc,
                      7px 6px #eee, 6px 7px #ccc,
                      8px 7px #eee, 7px 8px #ccc,
                      8px 8px #eee;

Check the Image below to see how it Looks.
3d text effect using css blogolect

Blurry Text

Turn your normal text to a cool blurry text using CSS. Use the below CSS code to create a blurry text and grab your visitors attention :)

.blur {
   color: transparent;
   text-shadow: 0 0 4px rgba(0,0,0,0.6);
}

Check the Image below to see how it Looks.
blurry text effect using css blogolect

Flip an Image

Sounds crazy! You can flip images with CSS. Try this amazing effect for your blog. Use the below CSS to Flip an Image.

img {
        -moz-transform: scaleX(-1);
        -o-transform: scaleX(-1);
        -webkit-transform: scaleX(-1);
        transform: scaleX(-1);
        filter: FlipH;
        -ms-filter: "FlipH";
}

Before you try this effect, have a look at the image below.
flipped image effect using css blogolect

Animated Gradient Effect

Create animated gradient effect for your blog buttons. Use the below CSS to create animated gradient effect. You can also use this effect for styling your labels widget.

.button {
background-image: linear-gradient(#518712, #124555);
background-size: auto 200%;
background-position: 0 100%;
transition: background-position 0.5s;
}
.button:hover {
background-position: 0 0;
}

We hope you enjoyed this article and also learned some new CSS tricks. We'll cover some more tutorials on CSS this week. Stay Tuned!

Share these tricks with your friends, don't forget to subscribe us and Join our Bloggers Forum on Facebook @ https://www.facebook.com/groups/blogolectforum

How to Add a Live Chat Support to Blogger

- 8 Comments
If you're running an Online Store, a Community or an Online Service. A quality Customer Support System really helps you in increasing your sales and interaction with your visitors. While choosing an online service, people look for its features and Live Chat Support is the most crucial.
How to Add a Live Chat Support to Blogger
Having a Live Chat Support system helps you to easily interact with your visitors, so that you can understand their needs, which will help you in improving your services and their experience too. In case of an online store, a Live Chat Support system will help you in increasing your sales. Recently, we received an email from one of our visitors that he wants to add a Live Chat Support system to his blog. In this tutorial we are going to share step by step guide on How to Add a Live Chat Support to Blogger Blog.

It hardly takes 3 minutes to add a Live Chat Support system to your Blog.

Before you add it to your blog, take a look at the image below to see how it looks. On clicking the + button a chat box will open for customer support where your visitors can ask you questions or feedback.
How to Add a Live Chat Support to Blogger

How to Add a Live Chat Support to Blogger Blog 

First and foremost, go to http://www.purechat.com and click Sign Up Free button. A popup will appear, enter your login information and click Submit button.
How to Add a Live Chat Support to Blogger Blog
You'll redirected to the next page, a popup will automatically appear with your chat widget code. If you want to add it without any customizations then Copy that code, go to your Blogger Dashboard >> Select a Blog >> Layout >> Add a Gadget >> Select HTML/JavaScript gadget from the list and paste the copied code in the empty widget box.
How to Add a Live Chat Support to Blogger Blog
Otherwise if you want to customize it close that HTML popup, click Chat Widgets button and then click Edit button.
How to Add a Live Chat Support to Blogger Blog
You'll see a plenty of different tabs for customizing each and every section of your widget like Collapsed, Start Chat, No Operators, In Chat etc. You can also customize its Mobile version by clicking the Mobile tab. Customize your chat widget according to your taste and click Save button.
How to Add a Live Chat Support to Blogger Blog
Now click HTML button under the Installation heading, a code will appear, copy that code.
How to Add a Live Chat Support to Blogger Blog
Now go to your Blogger Dashboard >> Select a Blog >> Layout >> Add a Gadget >> Select HTML/JavaScript gadget from the list and paste the copied code in the empty widget box. Finally click Save button and you're done.
How to Add a Live Chat Support to Blogger Blog
We hope this article may have helped you in adding a Live Chat Support Widget to your Blogger Blog. Share this article with your friends, don't forget to subscribe us and Join our Bloggers Forum on Facebook @ https://www.facebook.com/groups/blogolectforum

Do share your thoughts in the comments section below.

Useful Keyboard Shortcuts for Blogger Post Editor

- 7 Comments
Everyone wants to do tasks quickly and if you're a Blogger, then you might want to write posts as quick as possible. Here comes the concept of Keyboard Shortcuts. A keyboard shortcut is a series of one or several keys/button for performing specific functions. Blogger is one of the most popular blogging platforms, with its hundreds of great features, it also provides the flexibility of using keyboard shortcuts in the blogger Post Editor. Blogger has several keyboard shortcuts you can use while editing posts. All these shortcuts work with the latest browsers like Mozilla, Chrome and Internet Explorer 5.5+. So, here they are:


Keyboard Shortcuts Function
CTRL + B To Bold
CTRL + I To Italic
CTRL + U To Underline
CTRL + Z To Undo
CTRL + Y To Redo
CTRL + x To Cut
CTRL + C To Copy
CTRL + V To Paste
CTRL + A To Highlight all the Text
CTRL + S To Auto Save and Keep editing
CTRL + P To Publish the Post
CTRL + F To Find a Word or Phrase

We hope this article may have helped you in learning some Useful Keyboard Shortcuts for Blogger Post Editor. Share this article with your friends, don't forget to subscribe us and Join our Bloggers Forum on Facebook @ https://www.facebook.com/groups/730927093629291

If we missed any shortcut, then let us know in the comments section below.

How to Add a Forum to Your Blogger Blog

- 30 Comments
A Forum is a place where your blog visitors can interact with each other and discuss different trending/hot topics. Simply, a forum is a platform where your blog visitors can post questions, answers and interact with each other by sharing information and discussing hot topics. So, to better interact and connect with your blog readers/visitors, it’s always good to have a forum running on your blog. Another advantage of having a forum is that it takes the place of the FAQ page, since most of the questions will be answered by you and your visitors too.

But how to create a forum for a blogger blog? Well, it's pretty simple! Today in this article we'll show you that How to Add a Forum to Your Blogger Blog with Nabble. A preview of the forum is given at the end of the post.
How to Add a Forum to Your Blogger Blog

How to Add a Forum to Your Blogger Blog

First and foremost, go to http://www.nabble.com and click Create a Free Forum.
How to Add a Forum to Your Blogger Blog
It'll ask you to create an account, enter your account information, give a Name to your forum, choose a Language and click Create Forum button.
How to Add a Forum to Your Blogger Blog
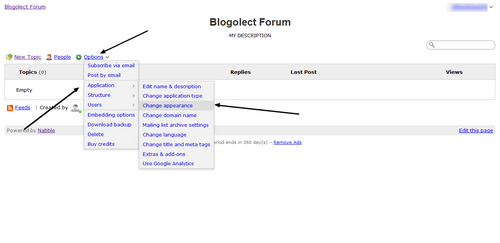
You'll be redirected to your forum, to customize your forum e.g. its colors, font style, etc. click Options >> Application >> Change Appearance.
How to Add a Forum to Your Blogger Blog
Once everything is done, go back to your forum and again go to Options >> Click Embedding options and copy the JavaScript code.
How to Add a Forum to Your Blogger Blog
Okay, now its time to embed it to your Blogger Blog.
Note: You're the moderator of your forum and only you can delete topics or edit your forum.

How to Embed the Forum to your Blogger Blog

Log in to your Blogger Account >> Select a Blog >> Pages and create a new Blank Page. Now switch the editor to HTML Mode and paste the JavaScript code that we copied earlier. Once everything is done, click Publish button and you're done. Here's a preview of my forum.
How to Add a Forum to Your Blogger Blog
Go to that Page and check your Forum. Now your Visitors can easily ask you questions and can discuss hot topics by clicking New Topic button.

From Editors Desk

We hope this article may have helped you in creating a forum for your Blogger Blog. Share this article with your friends, don't forget to subscribe us and Join our Bloggers Forum on Facebook @ https://www.facebook.com/groups/blogolectforum

How to Remove Hyperlinks From Post Images in Blogger

- 7 Comments
If you're using a custom blogger template, then you might have noticed that few templates does not supports blogger Image Lighbox, due to which, when someone clicks on an image from your post it opens in a new tab. Since blogger stores all your images in Picasa web album, so whenever user clicks on an images from your websites, it takes them to a different destination, which causes increase in bounce rate and your blog will have a bad impact on search engines. That's why its important to remove hyperlinks from images if your template doesn't supports image Lightbox. Recently one of our users asked us about Removing Hyperlinks From Post Images in Blogger. So today in this tutorial we'll show you that How to Remove Hyperlinks From Post Images in Blogger.
How to Remove Hyperlinks From Post Images in Blogger

How to Remove Hyperlinks From Post Images in Blogger

First and foremost go to your Blogger Dashboard >> Select a Blog >> Template and click Edit HTML button. Click inside the template code area and by using Crtl+F search for the ]]></b:skin> tag. Now copy the below CSS code and paste it just above/before it (]]></b:skin> tag)

.post{
position: relative !important;
z-index: 10 !important;
}

.hentry img, .separator{
position: relative !important;
z-index: -1 !important;
}

Once everything is done click Save Template button and you're done!

Congratulations: You've successfully disabled click on your post images in blogger. Share this article with your friends, subscribe to us and don't forget to Join our Bloggers Forum on Facebook @ https://www.facebook.com/groups/730927093629291

18 Reasons Why Newbie Bloggers Quit Blogging

- 23 Comments
Thousands of blogs are created everyday but only a few succeed and the rest fails. Have you ever wondered that why most of the bloggers fails at blogging. About 90% of bloggers quit blogging in the first 6 months.

Why does this happen? Why do newbie bloggers fail in taking their blog to the next level? Mostly newbies start blogging for making money. They think that blogging is the easiest way of making money, but they're wrong.
18 Reasons Why Newbie Bloggers Quit Blogging
Starting a blog is easy, with services like Blogger, Wordpress etc. you can start your own blog within 3-4 minutes but getting traffic/visitors to your blog and taking it to success requires lots of hardwork, writing skills and a great deal of time. Another major problem of newbies is that they want to make thousands of dollars within 2-3 months. Newbies get motivated by reading others success stories and they start blogging without knowing the fact that how much time and effort it takes to make a blog successful.

Why Newbies fails and quit blogging within a span of 3-6 months? Here are some of the most common reasons why newbies fail:

Recommended Guides For You:

18 Reasons Why Newbie Bloggers Quit Blogging

1- Impatience - Blogging takes time and patience. Its not possible to get 1,000,000 traffic in just 2 months.

2- Lack of Motivation - You're not motivated.

3- Lack of Interest - People think that blogging is a kids play but they're wrong. You can start a blog with just a few clicks but getting traffic is the worst part.

4- Passionless - It needs passion to do every work. Newbies do blogging just for money, they're not passionate. And when they are unable to get success they quit Blogging.

5- Wrong Niche - Many newbies fail because they choose a niche which is associated with lots of money, instead of their interests or hobby. They don't have enough knowledge about their niche, which leads them to failure.

6- Running too many Blogs - Mostly, newbies create too many blogs, tech blog, design blog, personal blog bla bla bla. Running too many blogs once is really hard and requires a great deal of time, so they get bored of it and quit blogging.

7- Looking for Quick Money - Newbies think that blogging is the easiest way for making money. They get motivated by reading others success stories. Newbies don't understand that blogging is not a kids play, like all other business, blogging also requires time, experience and hardwork.

8- Not having Good Topics - While starting a blog people think that writing and publishing posts is easy, and they would somehow be able to add lots of quality content to their blog. They do research for finding content but after 3-4 months they become frustrated and at last BYE BYE BLOGGING :(

9- Blog Promotion - Newbies only focus on publishing posts on daily basis, not on promoting their posts. Without promotion getting traffic is impossible.

10- Lack of Time - Blogging requires a great deal of time, but newbies are unaware, they think that they can write unique and quality content in just 10-20 minutes. As a result --> They write Poor Content >> Zero Traffic >> Okay I Quit.

11 - Lack of Writing Skills - Newbies just write articles and publish them daily but they never pay attention to their writing skills. After a few months they realize it and quit blogging thinking that only writers can do blogging.

12- I'm the King - Thinking that blogging is just about publishing content, newbies only focus on publishing articles. They think that learning is a waste of time so they use the Copy-Paste formula and lost their traffic.

13- Giving Up Too Quickly - The biggest reason why newbies fail is that they give up quickly within a span of 2-4 months.

14- Giving more Attention to Stats - Instead of focusing on their goals newbies pay more attention to their pageviews and worry about it.

15- No Keyword Research - Newbies do a big mistake of writing posts without keyword research. Writing posts without proper keyword research, decreases the chances of your blog appearance in the search results.

16- SEO Problem - SEO is important for getting higher ranking in search results but newbies don't pay attention to it.

18- Terrible Blog Design - Design is another issue, newbies design their blog poorly. Imagine if you land on a poorly designed blog, would you like to surf it? Probably not. So, if your blog is poorly designed then other people will do the same.

Conclusion 

My advice to new bloggers is that, do hardwork and never give up. If you want to become a professional blogger then you should avoid these mistakes. Blogging is not easy, it requires lots of time, hardwork, passion and skills too. Choose the topic in which you're interested. Before you start your career in blogging, learn its basics. From your first day of blogging write like professionals and improve your writing skills.

Share your valuable thoughts and feedback in the comments section below. Share this article with your friends and don't forget Join our Bloggers Forum on Facebook @ https://www.facebook.com/groups/730927093629291

How To Recover Your Blogger Blog From Backup (Update)

- 4 Comments
In our previous tutorial we discussed about How To Backup Your Blogger Blog Posts. A backup is important for your blog if you to be safe from any problem. It is essential for everyone to learn How To Backup and Restore your Blog. If your blog gets deleted by Google and you want to publish all those posts on your new blog, your blog gets hacked or you accidentally deleted your blog posts. With all of these risks, backing up your blog has become an essential precaution that you too need to take. As you know that in our previous article we discussed about How To Backup Your Blogger Blog Posts. And today in this article we'll show you that How To Recover Your Blogger Blog From Backup.
How To Recover Your Blogger Blog From Backup

How To Recover Your Blogger Blog From Backup

Step 1. Go to your Blogger Dashboard >> Select a Blog >> Setting >> Other
Step 2. Now look for Blog Tools heading and click the Import blog option
How To Recover Your Blogger Blog From Backup
Step 3. A popup will appear, Click Browse button and select your backup file (How to Backup your Blog)
How To Recover Your Blogger Blog From Backup
Step 4. Enter the words you see in the image in the Type the text: field and click Import Blog button
Note: Tick the Automatically publish all imported posts and pages option to automatically publish all your posts and page otherwise leave it empty
Step 5. All your blog posts will be imported back to your blog
Note : If you backup your blog daily then you can recover your blog easily after serious damage or after complete deletion.
Congratulations: You've successfully imported all your posts and pages back to your blog.
Do share this article with your friends and Join our Bloggers Forum on Facebook @ https://www.facebook.com/groups/730927093629291

How To Backup Your Blogger Blog Posts

- 9 Comments
Today, In this article we are going to discuss that why it is important to backup your blog and how to backup your blog. In the world of blogging if you want to be safe from any problem even your blog posts. So you must be ready to face the problem.
How To Backup Your Blogger Blog Posts
Your blog may gets deleted by Google and you want to publish all those posts on your new blog or you accidentally deleted your blog posts. With all of these risks, backing up your blog has become an essential precaution that you too need to take. Because by having a backup you can easily publish all those posts again on your blog.

Recommended:
Make your Blog Awesome by Font Awesome Icons
How to Backup your Blogger Template
How to Restore your Blogger Template from Backup

If you want to prevent your blog from any damage then you must create a backup of your blog. By having a backup, you can prevent your blog from damage by restoring your content. You must take backup of your blog daily or weekly.
So, just follow the steps below to backup your blog posts :

How To Backup Your Blogger Blog Posts

Step 1. Go to your Blogger Dashboard >> Select a Blog >> Setting >> Other
Step 2. Now look for Blog Tools heading and click the Export blog option
How To Backup Your Blogger Blog Posts
Step 3. A popup will appear, click Download Blog
How To Backup Your Blogger Blog Posts
Step 4. Save that file and that is the backup of your blog.
Keep the file in a Safe Location
Important :
This backup will only backup your blog posts, not the images.

From Editors Desk

We hope this article may have helped you in learning How To Backup Your Blogger Blog Posts. Share it with your friends and don't forget to subscribe us. Join our Bloggers Forum on Facebook @ https://www.facebook.com/groups/730927093629291