Don't Miss

Latest Posts
Browsing Category "Blogger Tricks"

How to Create an Animated CSS3 Drop Down Menu in Blogger

- 26 Comments
A Navigation Bar or Drop Down Menu is one of the most essential elements of a blog. A drop down menu makes your blog user-friendly, allowing your visitors to easily navigate your blog by simply choosing their desired category from the menu. Apart of all these advantages it also gives your website a new unique and professional look. Almost all the website either its a top website or a newly created are using Drop Down Menus. Recently we shared an article on How to Create a Drop Down Menu in Blogger. The design of that menu was simple and the one we're going to share today has a stylish and professional look with eye catching CSS transitions. Lets begin:
How to Create an Animated CSS3 Drop Down Menu in Blogger

How to Create an Animated CSS3 Drop Down Menu in Blogger

First and foremost, log in to your Blogger Account >> Select a Blog >> Template and click Edit HTML. Click inside the template code area, press Ctrl+F to search and search for the ]]></b:skin> tag. Now copy the below CSS code and paste it just above/before the ]]></b:skin> tag

a, #navigation li .sub-nav-wrapper .sub-nav li {
 transition: all 0.7s;
 -moz-transition: all 0.7s;
 -webkit-transition: all 0.7s;
}
#navigation li .sub-nav-wrapper {
 pointer-events: none;
 opacity: 0;
 filter: alpha(opacity=0);
 top: 0;

 transition: all 0.4s cubic-bezier(1,-5,0,0) 0s;
 -moz-transition: all 0.4s cubic-bezier(1,-5,0,0) 0s;
 -webkit-transition: all 0.4s cubic-bezier(1,-5,0,0) 0s;
}
#navigation li:hover .sub-nav-wrapper {
 pointer-events: auto;
 opacity: 1;
 filter: alpha(opacity=100);
 top: 30px;
}
#navigation {
 position: relative;
 text-align:center;
 margin:0 auto;
 background-color:#fff;
 border-bottom: 2px solid #009999;
}
#navigation li {
 position: relative;
 list-style: none;
 display: inline-block;
 padding: 5px 20px;
}
#navigation li a {
 padding: 5px;
 display: block;

 font-family: 'Open Sans', Arial, Helvetica, sans-serif;
 font-size: 14px;
 font-weight: 700;
 color: #3b3b3b;
 text-align: left;
 text-shadow: 1px 1px 0 rgba(255,255,255,0.25);
}
#navigation li:hover .main {
 color: #ee4e1d;
}
#navigation li .sub-nav-wrapper {
 display: block;
 position: absolute;
 z-index: 30;
 margin-left: -16px;
}
#navigation li .sub-nav-wrapper .sub-nav {
 width: 150px;
 margin-top: 6px;
 background: #fff;
 border-top: 1px solid #fff;
 padding:0;
 box-shadow: 0 1px 2px rgba(0,0,0,0.35);
 -moz-box-shadow: 0 1px 2px rgba(0,0,0,0.35);
 -webkit-box-shadow: 0 1px 2px rgba(0,0,0,0.35);
}
#navigation li:hover .sub-nav-wrapper {
 display: block;
}
#navigation li .sub-nav-wrapper .sub-nav li {
 list-style: none;
 display: block;
 margin: 0;
 padding: 0;
 text-align: left;
 border-bottom: 1px solid #009999;
}
#navigation li .sub-nav-wrapper .sub-nav li:last-child {
 border: none;
}
#navigation li .sub-nav-wrapper .sub-nav li a {
 display: block;
 padding: 11px 20px;
 font-size: 12px;
 font-weight: 600;
}
#navigation li a:hover {
color: white;
}
#navigation li .sub-nav-wrapper .sub-nav li:hover {
 background: #009999;
 border-bottom: 1px solid #009999;
 color: #3b3b3b;
 text-decoration: none;
}

CSS done, its time for HTML. Search for the <body> tag. Copy the below HTML code and Paste it Just below/after the <body> tag.
Note: You can add HTML wherever you want.

<ul id="navigation">

    <li>
        <a href="index.html" class="main">Home</a>
    </li>
   
    <li>
        <a href="#" class="main">Blogger</a>
        <div class="sub-nav-wrapper"><ul class="sub-nav">
            <li><a href="#">Tips</a></li>
            <li><a href="#">Widgets</a></li>
            <li><a href="#">Traffic Tips</a></li>
        </ul></div>
    </li>
   
    <li>
      <a href="#" class="main">Services</a>
        <div class="sub-nav-wrapper"><ul class="sub-nav">
            <li><a href="#">Blogger</a></li>
            <li><a href="#">Logo</a></li>
 <li><a href="#">Banner</a></li>
            <li><a href="#">Wordpress</a></li>
        </ul></div>
    </li>
   
    <li>
      <a href="#" class="main">Tutorials</a>
        <div class="sub-nav-wrapper"><ul class="sub-nav">
            <li><a href="#">Logo</a></li>
            <li><a href="#">HTML/CSS</a></li>
            <li><a href="#">Design</a></li>
            <li><a href="#">Illustrator</a></li>
            <li><a href="#">Web Design</a></li>
        </ul></div>
    </li>
   
    <li>
      <a href="#" class="main">About</a>
        <div class="sub-nav-wrapper"><ul class="sub-nav">
            <li><a href="#">Website</a></li>
            <li><a href="#">Our Team</a></li>
            <li><a href="#">Our Mission</a></li>
        </ul></div>
    </li>
   
    <li>
      <a href="#" class="main">Contact</a>
    </li>
   
</ul>

  • Replace the Categories with your own and replace # with their links

Finally click Save Template button and you're done!

We hope this article may have helped you in learning How to Create an Animated CSS3 Drop Down Menu in Blogger. Share this article with your friends and don't forget to subscribe us!

How to Add Disqus Comment System to Blogger

- 125 Comments
The blogger commenting system only allows you to comment using your Google Account, but what would happen if it is must for your commenters to connect to your website through Facebook or Twitter account to make a comment. It would be great! Right. But how? Don't worry, the commenting system we're going to share with you today will help you to do this.
How to Add Disqus Comment System to Blogger
Today we're going to discuss about the DISQUS commenting system. Disqus is a flexible commenting system which allows your visitors to comment using their social profiles like Facebook and Twitter. Disqus comment system is full of advantages and helps you to easily build a community. It has lots of features, some features are:

  • Unique Design: Disqus has a unique and professional design that fits in all websites.
  • Social Login: Your visitors can easily comment using their social profiles.
  • Stars and Thumbs Up: You visitors can rate the discussion using starts and can thumbs up others comments.
  • Threaded System: It has Real time threaded system which makes your discussions more easy.
  • Comment Moderation: You can also enable comment moderation in order to approve your comments.
and lots more...

Integrating Disqus comment system is too easy and no coding is required. Just a few clicks and done. Today in this tutorial we'll show you that How to Add Disqus Comment System to Blogger.

How to Add Disqus Comment System to Blogger

First and foremost, go to Disqus.com and click Sign Up button. Now you've to create your account, enter your Log in information i.e. username, email and password. or you can also sign up with Facebook, Twitter and your Google account.
Once your account is created, it'll redirect you to the homepage. Now click the Gear button from the top and then click Add Discuss to Site button.
How to Add Disqus Comment System to Blogger
On the next page, it'll ask you to enter your website information. Enter your site name, your unique disqus URL (blogname.disqus.com), select a category and click Finish Registration button.
How to Add Disqus Comment System to Blogger
Almost done, it'll ask you to choose your Platform, so choose Blogger and click Add to my Blogger Site. A new tab will open, just click Add Widget button and you're done.
How to Add Disqus Comment System to Blogger

Import your Existing Blogger Comments into Disqus

To import your existing Blogger Comments into Disqus, click Tools > Import button as shown in the above image and click Import Comments from Blogger button from the next page.
That's it!

We hope this article may have helped you in learning How to Add Disqus Comment System to Blogger. Share it with your friends and don't forget to subscribe us!

How to Create a Three Column Footer Widget in Blogger

- 19 Comments
Have you ever thought about having an extra space in your blog footer section for adding more widgets to your blog? You might have seen three column footer widgets section on many websites. Most of the templates come with built-in footer sections, but if unluckily your template doesn't contains a footer and you want to add it! Don't worry, we'll help you in creating a three column footer in blogger.

Recommended for You:
Create a jQuery Sliding Menu with Expand/Collapse Function in Blogger
Add a Tabbed Table of Contents to your Blogger Blog
How to Create an Advanced Admin Control Panel in Blogger

If your sidebar is loaded with various widgets and you want to add more widgets without removing them. Then footer section is the best solution. By creating a footer section in your blog, you can add more widgets to your blog in the footer section. So, today in this tutorial we're going to share How to Create a Three Column Footer Widget in Blogger.
How to Create a Three Column Footer Widget in Blogger

How to Create a Column Footer in Blogger

First of all, log in to your Blogger Account >> Select a Blog >> Template >> Click Edit HTML and search for the ]]></b:skin> tag. Now copy the below CSS code and paste it just above/before it (]]></b:skin> tag)

/* -----   Footer Start   ----- */
#footer {
       margin:auto;
       padding: 0px 0px 10px 0px;
       width: 100%;
       background:#333434;
}
#footer-wrapper {
       margin:auto;
       padding: 20px 0px 20px 0px;
       width: 960px;
}

#footercol-wrapper {
       background:#333434;
       float: left;
       margin: 0px 5px auto;
       padding-bottom: 20px;
       width: 32%;
       text-align: justify;
       font-size:100%;
       line-height: 1.5em;
       word-wrap: break-word;
       overflow: hidden;
       color:#fff;
}

.footercol {margin: 0; padding: 0;}
.footercol .widget {margin: 0; padding: 10px 20px 0px 20px;}

.footercol h2 {
      margin: 0px 0px 10px 0px;
      padding: 3px 0px 3px 0px;
      text-align: center;
      color:#fff;      text-transform:uppercase;
      font-family:'Skolar Bold',Palatino,"Cambria","Droid Serif","Georgia","Times New Roman","Times",serif;
      font-size:21px;
      border-bottom:2px solid #fff;
}

.footercol ul {
      margin: 0px 0px 0px 0px;
      padding: 0px 0px 0px 0px;
      list-style-type: none;
}

.footercol li {
      margin: 0px 0px 2px 0px;
      padding: 0px 0px 1px 0px;
      border-bottom: 1px solid #ccc;
}
/* -----   Footer End   ----- */

Again search for </body> tag and just above/before it add the following code

<div id='footer'>
<div id='footer-wrapper'>
<div id='footercol-wrapper'>
<b:section class='footercol' id='footercol1' preferred='yes'>
</b:section>
</div>
<div id='footercol-wrapper'>
<b:section class='footercol' id='footercol2' preferred='yes'>
</b:section>
</div>
<div id='footercol-wrapper'>
<b:section class='footercol' id='footercol3' preferred='yes'>
</b:section>
</div>
<div style='clear: both;'/>
</div> </div>

Finally click Save Template button and you're done!
Now go to Layout and start adding widgets to your footer section.

For your Information:
  • background:#333434; The background color of the footer section, you can change it according to your website colors
  • background:#333434; The background color of the widget columns. In my case the backgrounds of both footer section and widget columns is same
  • color:#fff; The color of Widget Title

We hope this article may have helped you in creating a a Three Column Footer Widget in Blogger. Share this article with your friends, don't forget to subscribe us and Join our Bloggers Forum on Facebook @ https://www.facebook.com/groups/blogolectforum

Add a Christmas Snow Fall Effect to your Blogger Blog

- 10 Comments
Christmas is just a few days away, everyone is warming up and soon it will knock the doors of bloggers and the entire world. If you want to impress your visitors and you want to give them a Christmas surprise then this is the right time to show your skills. There are hundreds of Christmas surprises that you can give to your visitors. Today we're going to share one of them that is called Snow Fall Effect. This effect will display a Snow Fall on your blog and that it will definitely surprise your visitors.
Add a Christmas Snow Fall Effect to your Blogger Blog
If you're thinking to decorate your blog this Christmas and you want to give them a mind blowing surprise then you're at the right place. Its time to show your skills and amaze your visitors by adding Snow Fall effect to your blog. In this tutorial we'll show you that How to Add a Christmas Snow Fall Effect to your Blogger Blog.

Add Snow Fall Effect to your Blogger Blog

Step 1. Go to your Blogger Dashboard >> Select a Blog >> Template and click Edit HTML button
Step 2. Click inside the template code area, use Ctrl+F and search for the </head> tag
Step 3. Now Copy (Ctrl+C) the below code and Paste (Ctrl+V) it just above/before the </head> tag

<script src='https://ajax.googleapis.com/ajax/libs/jquery/1.9.1/jquery.min.js'/>
<script src='http://yourjavascript.com/146111102320/snowfall.js'/>

<script>
$(document).ready( function(){
$.fn.snow({ minSize: 10, maxSize: 50, newOn: 400, flakeColor: '#ffffff' });
});
</script>

Note: Remove the code in purple color if you already have jQuery in your template.
Customization:
  • Increase or Decrease the minimum size of snow by changing the value in minSize: 10,
  • Increase or Decrease the maximum size of snow by changing the value in maxSize: 50,
  • Increase or Decrease the value in the newOn: 400, option for changing the snow fall speed
  • To change the snow color replace #ffffff with your own color code

Step 4. Click Save Template button
And you're done!

From Editors Desk

We hope this article may have helped you in adding a snow fall effect to your blogger blog. Share this article with your friends and don't forget to Join our Bloggers Forum on Facebook @ https://www.facebook.com/groups/730927093629291

How to Create an Image Rollover Effect

- 3 Comments
The Image Rollover effect is one in which image changes on moving your mouse cursor on the image. It changes the image on moving mouse cursor on it and reverts it back to the original image on mouse out. Image Rollover is a popular effect used in many websites. Bloggers use this effect for gaining visitors attention. There is nothing technical in creating this effect, all you need is just two pictures. The onMouseOver and outMouseOut attributes are used to make it functional. Image Rollover is a simple trick that you can use for gaining attention of your visitors.
Move your Mouse Cursor on the Image below to see how it works:

How to Create an Image Rollover Effect

Here's the code for creating a Rollover Effect:

<a href="URL ADDRESS"><img src="URL OF THE FIRST IMAGE" onmouseover="this.src='URL OF THE SECOND IMAGE'" onmouseout="this.src='URL OF THE FIRST IMAGE" /></a>

Customization:

  • Replace URL ADDRESS with the URL where you want to redirect people on clicking
  • Replace both URL OF THE FIRST IMAGE with the URL of your first image
  • Replace URL OF THE SECOND IMAGE with the URL of your second image (That will appear on mouse hover)

How to Use Image Rollover Effect in Blogger Posts

Log in to your Blogger Account >> Select a Blog >> New Post and Switch to HTML tab. Now copy the above code and paste it where you want to add the image in your post. Make necessary customizations and Publish your Post.

How to Use Image Rollover Effect in Blogger Sidebar

Log in to your Blogger Account >> Select a Blog >> Layout >> Add a Gadget and select HTML/JavaScript gadget from the list. Paste that code, make necessary customization and click Save button.

We hope this article may have helped you in learning How to Create an Image Rollover Effect. Share this article with your friends and Join our Bloggers Forum on Facebook @ https://www.facebook.com/groups/blogolectforum

How to Add a Post Rating System in Blogger

- 29 Comments
Post Star Rating system is a great way to get feedback from your visitors that what type of posts they like. It provides a quick way to your visitors to share their opinions with just a simple click. By adding a Post Rating System to your blog, you'll be able to know whether a post is useful for your blog or not.

You may have seen Star Rating system on image websites. These websites use a star rating system for rating their images and checking that what type of images their visitors like.
How to Add a Post Rating System in Blogger
There are many post rating systems out there, but the problem is that which one is the best, flexible and easy to use. While I was searching for a post rating system, I came to rating-widget.com, that's flawlessly the best post rating system. Using rating-widget.com, you can create a post rating system for almost all blogging platforms (Blogger, Wordpress, Wix). No skills are required for creating a post rating system using rating-widget. So, today in this tutorial we'll show you that How to Add a Post Rating System in Blogger.

How to Add a Post Rating System in Blogger

First of all, go to http://rating-widget.com/get/rating/ and select Blogger platform from the list. If you are an expert then you may select JavaScript and add it manually to your blog.
How to Add a Post Rating System in Blogger
You'll see a plenty of options for customizing your widget like styles, themes, colors, font, start etc. Customize your widget, and once you're done, click Sign Up and Add to Blogger button. You can Sign Up using your Facebook, Twitter and LinkedIn account or sign up with your Email.
How to Add a Post Rating System in Blogger
After Signing in click the orange Add to Blogger button or you can also copy the source code by pressing Source Code button and paste it anywhere in your blog to show your rating widget.
How to Add a Post Rating System in Blogger
Congratulations: You've successfully added a Post Rating System to your Blogger Blog.

We hope this article may have helped your in learning How to Add a Post Rating System in Blogger. Share this article with your friends, don't forget to subscribe us and Join our Bloggers Forum on Facebook @ https://www.facebook.com/groups/blogolectforum

How to Add a Forum to Your Blogger Blog

- 30 Comments
A Forum is a place where your blog visitors can interact with each other and discuss different trending/hot topics. Simply, a forum is a platform where your blog visitors can post questions, answers and interact with each other by sharing information and discussing hot topics. So, to better interact and connect with your blog readers/visitors, it’s always good to have a forum running on your blog. Another advantage of having a forum is that it takes the place of the FAQ page, since most of the questions will be answered by you and your visitors too.

But how to create a forum for a blogger blog? Well, it's pretty simple! Today in this article we'll show you that How to Add a Forum to Your Blogger Blog with Nabble. A preview of the forum is given at the end of the post.
How to Add a Forum to Your Blogger Blog

How to Add a Forum to Your Blogger Blog

First and foremost, go to http://www.nabble.com and click Create a Free Forum.
How to Add a Forum to Your Blogger Blog
It'll ask you to create an account, enter your account information, give a Name to your forum, choose a Language and click Create Forum button.
How to Add a Forum to Your Blogger Blog
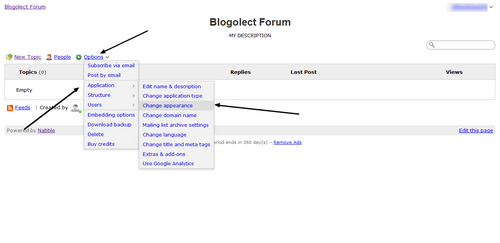
You'll be redirected to your forum, to customize your forum e.g. its colors, font style, etc. click Options >> Application >> Change Appearance.
How to Add a Forum to Your Blogger Blog
Once everything is done, go back to your forum and again go to Options >> Click Embedding options and copy the JavaScript code.
How to Add a Forum to Your Blogger Blog
Okay, now its time to embed it to your Blogger Blog.
Note: You're the moderator of your forum and only you can delete topics or edit your forum.

How to Embed the Forum to your Blogger Blog

Log in to your Blogger Account >> Select a Blog >> Pages and create a new Blank Page. Now switch the editor to HTML Mode and paste the JavaScript code that we copied earlier. Once everything is done, click Publish button and you're done. Here's a preview of my forum.
How to Add a Forum to Your Blogger Blog
Go to that Page and check your Forum. Now your Visitors can easily ask you questions and can discuss hot topics by clicking New Topic button.

From Editors Desk

We hope this article may have helped you in creating a forum for your Blogger Blog. Share this article with your friends, don't forget to subscribe us and Join our Bloggers Forum on Facebook @ https://www.facebook.com/groups/blogolectforum

How to Customize Labels Cloud Widget in Blogger

- 5 Comments
Do you want to make your Labels Cloud widget more prominent and attractive for your visitors? Labels Cloud is a widget provided by Blogger, that allow you to arrange your content or categorize your content under specific labels. This widget helps your visitors to easily browse your posts by choosing a specific label or category. This widget makes your blog user friendly. You can add this widget to your sidebar or footer.

The default design of the Labels Cloud widget is simple and not that much attention-grabbing. Therefore, to make it look clean and stylish, we've to customize it. As Blogger is a flexible platform and you can easily customize any element of your blog using CSS. So, we'll also customize the Labels Cloud using CSS3. Recently, one of our visitors asked us that How to Customize Labels Cloud Widget in Blogger. In this article, we'll show you that How to Customize Labels Cloud Widget in Blogger.

Don't Forget to Read:
101 Ways to Increase Your Website Traffic
5 Reasons You'll Quit Blogging Within 3 Months
18 Reasons Why Newbie Bloggers Quit Blogging

How to Customize Labels Cloud Widget in Blogger

First and foremost, Log in to your Blogger Account >> Select a Blog >> Template and click Edit HTML. Click inside the template code area and by using Ctrl+F search for the ]]></b:skin> tag. Now copy the below code and paste it just above/before it (]]></b:skin> Tag)

/*---------Labels Cloud--------*/
.label-size{
margin:0 2px 6px 0;
color:#666;
padding: 7px;
border: solid 1px #C6C6C6;
border-radius: 3px;
text-transform: uppercase;
text-decoration:none;
float:left;
text-decoration:none;
font-size:14px;
color:#666;
}

.label-size:hover {
border:1px solid #6BB5FF;
text-decoration: none;
-moz-transition: all 0.5s ease-out;
-o-transition: all 0.5s ease-out;
-webkit-transition: all 0.5s ease-out;
-ms-transition: all 0.5s ease-out;
transition: all 0.5s ease-out;
}

.label-size a  {
float:left;
text-transform: uppercase;
text-decoration: none;
color:#fff;
}
.label-size a:hover  {
text-decoration: none;
color:#2aa4cf;
}

Hit the Save Template button and you're done.
Congratulations: You've successfully customized your Labels Cloud widget.

From Editors Desk

We hope this article may have helped you in customizing Labels Cloud widget. Share this article with your friends, don't forget to subscribe us and Join our Bloggers Forum on Facebook @ https://www.facebook.com/groups/730927093629291

Create a Stitched Effect Using CSS

- 6 Comments
Everything is possible with the power of CSS and when it comes to blog design, designers and web developers are using different techniques for customizing their different blog elements. Almost all the customizations are done using CSS. There are thousands of visual effect we can achieve with CSS, the only limit is our imagination.

Today we're going to share a simple CSS trick: Creating a Stitched Effect using CSS, today we'll show you that how to create a stitched effect using CSS. You can use this effect for your heading, or you can also use it for stylizing your navigation menus, sidebar etc. using the CSS Markup. Let's start
Create a Basic Stitched Effect Using CSS
HTML Markup

<div class="stitched">
Stitched
</div>

CSS Markup

.stitched {
   background: #2aa4cf;
   color: #fff;
   font-size: 20px;
   font-weight: bold;
   line-height: 1.3em;
   padding: 10px;
   margin: 10px;
   border: 2px dashed #000000;
   border-radius: 7px;
   box-shadow: 0 0 0 4px #2aa4cf, 2px 1px 6px 4px rgba(10, 10, 0, 0.5);
   text-shadow: -1px -1px #2aa4cf;
}

For people using Blogger.com, learn How to Add CSS Codes to Blogger Using Template Designer. After adding the CSS Markup and use it anywhere.

Check out some more cool CSS Tricks

Thats all. So, try this simple CSS trick and stylize your blog.
Share this article with your friends and don't forget to Join our Bloggers Forum on Facebook @ https://www.facebook.com/groups/730927093629291

How to Change the Text Selection Highlighting Color in Blogger

- 50 Comments
The quickest way of selecting/copying text from a blog/website is to drag your mouse over that content. The selected content becomes highlighted. Mostly the highlighted text color is blue (Default color). Have you noticed that when you highlight/select text on some top websites, the text's background color is unique and matches the site's color scheme? So, have you ever wanted to change the highlighted text color of your blog? If yes then today we will show you that How to Change the Text Selection Color in Blogger. Its really easy to do and can be done with just the tiniest bit of simple CSS codes. This trick works on Chrome, Firefox, Safari and on latest versions of I.E.

How to Change the Text Selection Highlighting Color in Blogger

Step 1. Go to your Blogger Dashboard >> Select a Blog >> Template and click Edit HTML button
Step 2. Click inside the template code area and by using Crtl+F search for the ]]></b:skin> tag
Step 3. Now copy (Ctrl+C) the below code and paste (Ctrl+V) it just above/before it (]]></b:skin> tag)

::-moz-selection  {
background: #00cc00;
color: #FFFFFF;
text-shadow: none;  }
::selection   {
background: #00cc00;
color: #FFFFFF;
text-shadow: none; }

Customization:
  • Replace 00cc00 with the text highlight color
  • Replace FFFFFF with the text color (highlighted text color)

Step 4. Click Save Template button
And you're done!
Congratulations: You've successfully changed your Text Selection Highlighting Color. 

From Editors Desk

We hope this article may have helped your in learning How to Change the Text Selection olor in Blogger. Share this simple trick with your friends and don't forget to Join our Bloggers Forum on Facebook @ https://www.facebook.com/groups/730927093629291

How To Add Multiple Authors To Blogger Blog

- 66 Comments
A team is always better than a one man army and achieving our goals becomes easier with a team. Teamwork is better than being alone. Same is the case with blogging. Competition in the field of blogging has increased and survival has become very tough, so people are starting their blog with multiple niches. So it's always recommended to have a multiple author blog. If you have multiple author blog, you can have a schedule for posting and it will be easier for you to have a very good number of posts within a small period. If you want to boost up your blogging career then its important to start working as a team. But guys, one account, 4-5 or more people using one account, doesn't make a sense. So what to do now??? Not an issue, if your blog is hosted on blogger then you don't have to worry about it. Blogger all of its features also provides you an option for adding multiple authors to your blog. By adding multiple authors, all the people that you've added can access to your blog dashboard from their accounts. You can also manage their roles as Admin or Author. So, today in this tutorial we'll show you that How To Add Multiple Authors To Blogger Blog.
How To Add Multiple Authors To Blogger Blog

How to Add Multiple Authors to your Blogger Blog

First and foremost go to your Blogger Dashboard >> Select your Blog >> Setting. Now in the Basic section of setting hit the + Add Authors button under the Permissions heading
How To Add Multiple Authors To Blogger Blog
It'll ask you to enter the Email id's of the new authors, enter the Email id's of your authors and hit the Invite Authors button.
How To Add Multiple Authors To Blogger Blog
An email invitation will be sent to the specified persons. When he verifies the invitation, his name will be listed and you can decide his account type as Admin or Author.
All done :)

From Editors Desk

We hope this article may have helped you in learning How To Add Multiple Authors To Blogger Blog. Share it with your friends and don't forget to subscribe us. Join our Bloggers Forum on Facebook @ https://www.facebook.com/groups/730927093629291

How to Use Google Web Fonts in Blogger

- 3 Comments
There are millions of blogs on the internet, competing with each other. But it you want your blog to stand out and impress your visitors, then you've to make some changes to make your blog look different from others.
There are hundreds of elements that you can make different from others and one of them is your blogs font. Yes, you can make your blog look professional by using custom fonts.
How to Use Google Web Fonts in Blogger
Okay, you made this decision, but now you've to find a place where you can get free web fonts. I think that the best place for fonts is Google Web Fonts. Google Web Fonts inventory is full of gorgeous fonts that are extremely flexible and lightweight. There are over 600 fonts available in the Google Web Fonts. All of the fonts hosted, there are free to use in any commercial or personal projects.

Implementing Google Web Fonts in blogger is extremely straightforward. So if you are thinking to Add Google Web Fonts on your Blogger blog, then you're at the right place. Today we'll show you that How to Use Google Web Fonts in Blogger.

How to Use Google Web Fonts in Blogger

First of all go to http://www.google.com/fonts/. There are over 600 fonts available in the Google fonts. Okay now you've to choose your desired font, you'll see all the fonts with their previews and names. You can organize them by their font size and preview text. You can also sort them according to popularity, date added, alphabet, trending and by number of styles.
How to Use Google Web Fonts in Blogger
Once you've decided what font you want to choose click Add to Collection button and then click the Use button. It'll redirect you to the next page. From that page choose you font style i.e. light, normal or bold and scroll down.
How to Use Google Web Fonts in BloggerHow to Use Google Web Fonts in Blogger
After that you'll see the link to sylesheet, which would look like this:

<link href='http://fonts.googleapis.com/css?family=FONTNAME' rel='stylesheet' type='text/css'>

And its CSS style which would look like this:

font-family: 'FONTNAME';

Copy the stylesheet and go to Blogger.com >> Log in to your Blogger Account >> Select a Blog >> Template and click Edit HTML (Don't forget to Backup your Template). Click inside the template code area, use Ctrl+F to search and search for the <b:skin> tag. Just above it paste your font stylesheet code.  
Note: To prevent any error, add a forward slash ( / ) before the closing bracket of the stylesheet code. See the example below:

<link href='http://fonts.googleapis.com/css?family=FONTNAME' rel='stylesheet' type='text/css'>
The above is the stylesheet provided by Google, before adding it to your blog add a forward slash ( / ) before the closing bracket like:
<link href='http://fonts.googleapis.com/css?family=Oswald' rel='stylesheet' type='text/css' />

How to Use Google Web Fonts in Blogger
Finally you've added the stylesheet. To use this font on a specific part of your blog, you've to add the CSS code to its element/code. Copy the CSS code provided by Google and use it where you want. See the example below:

.post-title {font-family: 'FONTNAME'; }
OR
.post-body {font-family: 'FONTNAME'; }

You can use this code anywhere in your blog, just add the CSS to the element where you want to use it. Click the Save Template button and you're done.

From Editors Desk

The method will be difficult for newbies, but if you follow the steps correctly, I don't think that you'll find any difficulty. Share your feedback and suggestions in the comments section below. Do share this article with your friends and don't forget to subscribe us!

FormGet Review - An Ultimate Solution for HTML Contact Forms

- 1 Comment
Contact form is one of the most essential elements of a blog/website. If you're a website owner then it's obvious that the people would contact your for queries, feedback, payments etc.

If you think that coding skills are required for creating contact or payment form, you're wrong, nothing is required for building a form. Now a days  there are hundreds of free online services, using which you can easily create any type of form for your blog with zero coding/skills. But the problem is to choose which one is the best, but now you don't have to worry about it because today we're going to share one of the best contact form builders on the web.
FormGet Review - An Ultimate Solution for HTML Contact Forms
Yes, the best form builder and it is FormGet.com. FormGet is the ultimate solution for building HTML forms of any type. FormGet makes it easy to create and manage a form online with its unique features and powerful dashboard for free of cost. You can use forget for building contact forms, payments, bookings, admissions, auditions and hundred of other forms. Lets discuss the features of FormGet.

Features

  • Easy to Use: Building forms using formget is extremely easy, no skills or coding is required. Easily manage you multiple forms from one place.
  • Eye-Catching Design: You'll get addicted to it once you created a form with formget. Eye-catching colors, clean layout and beautiful design.
  • Drag and Drop Form Builder: Easily drag and drop fields to your form, just a few clicks and your form is ready.
  • Collect Payments: Easily collect payments from your clients with zero loss and secured method.
  • Powerful Helpdesk Tool: With its instant messaging tools, easily solve your clients issues, faster and quicker.
  • Users Tracking: FormGet tracks your visitors and provides you all the information like their country, IP address, OS, browser etc.
  • Email Integration: You can also integrate your account with accounts on MailChimp, Madmimi, etc., and get the collected data stored into your mailing list.

Some of the other features are:

  • Dropbox Integration
  • Google Analytics
  • Auto Responsers
  • File Upload
  • Captcha
  • Translation
  • Pre-built Templates
Now we'll show you that How to Create A Form Using FormGet.

How to Create A Form Using FormGet.com

First and foremost go to formget.com and click Build your Form Now button
FormGet Review - An Ultimate Solution for HTML Contact Forms
It'll redirect you to the Form Editor, customize your form and design it in your own taste, it provides you several options for your form such as Name, Email Address, Message, Date, Radio, Text and if you want to make a payment form you can choose Payment option. After you've customized your form, click Next Step button.
FormGet Review - An Ultimate Solution for HTML Contact Forms
Now Create a new account or start using by connecting your account to Google or Facebook.
FormGet Review - An Ultimate Solution for HTML Contact Forms
After signup you'll be redirected to your Form Preview, there you can Upload your Own banner, customize its colors and customize its footer setting.
FormGet Review - An Ultimate Solution for HTML Contact Forms
After customization click Save Changes and you'll be redirected to your Dashboard.
FormGet Review - An Ultimate Solution for HTML Contact Forms
From your Dashboard click Embed Form button, from the next page choose the type of your form, such as Sliding form or Full Form. Sliding form will be displayed on every page of your blog and it will slide out on clicking the button. Choose your form type and copy the code given just below it.
FormGet Review - An Ultimate Solution for HTML Contact Forms
If you choose a sliding form then paste the copied code between the opening and closing <head> tag in your template code. And in case of Full Form, copy the code and add it on a separate page. For adding full form in blogger go to Pages >> Create a New Page >> Switch to HTML tab >> Paste the Full Form Code and click Publish.

From Editors Desk

We hope this tutorial may have helped you in creating a Contact Form for your blog. If you like this tutorial, then do share it with your friends on Facebook, Google+ or twitter and don't forget to subscribe us!

How to Host CSS or JavaScript in Blogger Using Google Drive

- 3 Comments
Sometimes we need to host our codes on some external source for our blogger templates but unfortunately blogger doesn't provides the flexibility to host CSS or JavaScript files in a separate link. That's why hosting CSS and JavaScript files on your Blogger Blog has always been a matter of concern for bloggers. Embedding external files instead of writing the entire code has its advantages. Blogger doesn't provides any option for hosting external files but luckily Google Drive provides you an opportunity for hosting CSS or JavaScript files. Hosting your codes on external sources reduces your template size and your blog loads faster. Today in this tutorial we'll learn that How to Host CSS or JavaScript in Blogger Using Google Drive.
How to Host CSS or JavaScript in Blogger Using Google Drive

Features of Google Drive

There are many features for hosting your files on Google Drive and some of them are:-
  • Lots of Space: Google drive provides you 5Gb of free space, and its enough for hosting codes. If your drive is full, you can get more space by upgrading.
  • 100% Security: Google Drive provides you full proof security for your hosted files, you don't have to worry about your files security.
  • Privacy: Google drive lets you keep your files private, if you don't want to share your files with others you can change its privacy to Private and no one will be able to access except you.
  • Create and collaborate: Google drive provides you the flexibility to host different kinds of spreadsheets.
  • All this for Free: Yes all this is for free, you don't have to pay a penny for hosting you files on Google Drive.

How to Host CSS in Blogger Using Google Drive

Step 1. First of all you've to create the CSS file. To do this, copy the CSS code from your template that you want to upload. Log in to your Blogger Account >> Template >> Edit HTML >> Search (Ctrl+F) for <b:skin><![CDATA[ tag and copy the code till the ]]></b:skin>.
How to Host CSS or JavaScript in Blogger Using Google Drive
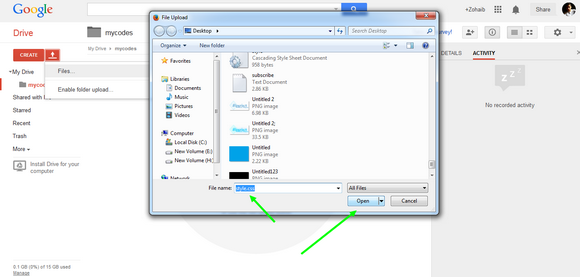
Step 2. Prepare your style.css file After copying the CSS code paste it in the notepad and remove that code from your template. Now save the notepad and name it as style.css. Note: The file extension must be in .css
How to Host CSS or JavaScript in Blogger Using Google Drive
Step 3. Now you've to host your CSS file. Go to Google Drive and log in to your Gmail account. Click Create >> create a new Folder >> Name it whatever you like such as mycodes or myscripts etc. and click Create button
How to Host CSS or JavaScript in Blogger Using Google Drive
Step 4. Open that folder >> Click Upload button and choose Files >> Now it will request you to choose your files, so select you file and click the Open button. A wizard would appear on the right side of your screen displaying your upload status.
How to Host CSS or JavaScript in Blogger Using Google Drive

How to Host CSS or JavaScript in Blogger Using Google Drive
Step 5. Once the file is uploaded, click the Share button >> Click the Get Shareable Link and choose Anyone Can View the File option. It will provide you the sharing link
How to Host CSS or JavaScript in Blogger Using Google Drive
Step 6. The sharing link would be something like https://drive.google.com/file/d/your-unique-file-code but you have to change it to https://googledrive.com/host/your-unique-file-code. For example if my file link is https://drive.google.com/file/d/0B43vwjPtKakCODMzcEc2amM3ZTQ so i will change it to https://googledrive.com/host/0B43vwjPtKakCODMzcEc2amM3ZTQ, Hope you got it.
Step 7. Its Time to Add your File/Link to Blogger. Log in to your Blogger Account and go to Template >> Edit HTML. Now search for the <head> tag and paste the below code just above/before it. Note: Don't forget to replace https://googledrive.com/host/your-unique-file-code with your file link that we created in the previous step and make sure that you've removed the CSS code from your template as we mentioned in the step 2.

<link href='https://googledrive.com/host/your-unique-file-code' rel='stylesheet'/>

Step 8. Click the Save Template button and you're done!

How to Host JavaScript in Blogger Using Google Drive

To host JavaScript on Google Drive, you have to follow the same steps, the changes are that the file Extension must be in .js form in case of JavaScript and for adding it to blogger use the code below

<script src='your-googledrive-javascript-link-here' type='text/javascript'></script>

Congratulations: You've successfully hosted your CSS and JavaScript in blogger using Google drive.

From Editors Desk

We hope that you've learned How to Host CSS or JavaScript in Blogger Using Google Drive. Share this tutorial with your friends and don't forget to subscribe us!
Got a Question? Please don't hesitate and ask us in the comments section below. If we missed something, then leave a comment below.

How to Change Links Color/Style in Blogger

- 22 Comments
Blog design has always been a great challenge for bloggers. Remember, quality content is not the only thing required for making a blog successful, but we also have to give attention to its design that how your blog looks. If your blog design is clean and attractive, then the visitors will get more interested in your blog. There are thousands of blogger templates available on the internet, but not a single template comes with 100% fulfillment. We have to customize its different sections and elements. Links color is also one of the. If you want to make links more visible and stands out from other text or, want to make the design more attractive to enhance user experience, then its important that you customize your link color/style and that's what we are going to learn today. Today in this tutorial we'll show you that How to Change Links Color/Style in Blogger.
How to Change Links Color/Style in Blogger

How to Change Links Color in Blogger

First and foremost log in to your Blogger Account and go to Template >> Edit HTML. Now look for the CSS code of the hyperlink in your template, which would be something like the below code

a { color:#2aa4cf;}
a:hover { color:#000000; }

The text in bold will be different for every template, simply search for a { tag and you'll find the above code. The first line is for you line style before hover (color:#2aa4cf;) and the seconds line is for the link style on hover (color:#000000; ). So by changing the styles and colors you can easily customize your links style. Use our HTML Color code generator to find your color code.

From Editors Desk

We hope this article may've helped you in learning How to Change Links Color/Style in Blogger. Share it with your friedns and dont forget to subscribe us!
Got a question? Please don't hesitate, ask us in the comments section below.

How to Customize Labels Cloud Widget in Blogger

- 5 Comments
Website design has always been a great challenge for bloggers. We spend hours and hours for searching a perfect template and on its design. Okay, say you found a perfect template, but remember not any template is perfect, you've to make customizations. After you found a template, now its time to add some important widgets, such as a popular posts widget, subscription boxes, label cloud, etc. After adding all these widgets, it's important to give them a professional look. If you're a web designer then you can easily customize them, but if not, then don't worry there are hundreds of tutorials available on the internet. So, today in this article we'll show you that how to customize labels cloud widget in blogger. Label Cloud is a widget provided by blogger, which is used to display labels on your blog. Simply labels are tags or categories which we use for categorizing our posts under different groups. You can easily customize Label cloud widget using CSS. Today when I came to update Blogolect, I thought to share something new and I started customizing my label cloud widget on a demo blog. After making some customizations, I created a new labels design using some simple CSS codes and transitions too. This widget shows a beautiful and smooth transition on hover and I hope this widget will give a professional look to your blog.
How to Customize Labels Cloud Widget in Blogger

How to Customize Labels Cloud Widget in Blogger

First and foremost log in to your Blogger Account and go to Template >> Click Edit HTML >> Click inside the code area, use Ctrl+F and search for the ]]></b:skin> tag
Now copy(Ctrl+C) the below code and paste(Ctrl+V) it just above/before the ]]></b:skin> tag

/*--- Custom Label Cloud With CSS3 By Blogolect.com --- */
.Label a{
background:#000;
padding:0 20px;
color:#fff!important;
height:32px;
font-size:14px;
text-transform:uppercase;
text-decoration:none;
line-height:32px;
padding-left:20px;
float:left;
border:none !important;
margin-left:5px;
margin-top:5px;
-webkit-transition:all .4s ease-in-out;-moz-transition:all .4s ease-in-out;-ms-transition:all .4s ease-in-out;-o-transition:all .4s ease-in-out;transition:all .4s ease-in-out;
}
.Label a:hover{
color:#000 !important;
background:#00cc00; }
/*--- Custom Label Cloud With CSS3 By Blogolect.com --- */

Hit the Save Template button and you're done!
Congratulations: You've successfully customized your label cloud widget in blogger.