Sometimes we need to host our codes on some external source for our blogger templates but unfortunately blogger doesn't provides the flexibility to host CSS or JavaScript files in a separate link. That's why hosting CSS and JavaScript files on your Blogger Blog has always been a matter of concern for bloggers. Embedding external files instead of writing the entire code has its advantages. Blogger doesn't provides any option for hosting external files but luckily Google Drive provides you an opportunity for hosting CSS or JavaScript files. Hosting your codes on external sources reduces your template size and your blog loads faster. Today in this tutorial we'll learn that How to Host CSS or JavaScript in Blogger Using Google Drive.
Features of Google Drive
There are many features for hosting your files on Google Drive and some of them are:-
- Lots of Space: Google drive provides you 5Gb of free space, and its enough for hosting codes. If your drive is full, you can get more space by upgrading.
- 100% Security: Google Drive provides you full proof security for your hosted files, you don't have to worry about your files security.
- Privacy: Google drive lets you keep your files private, if you don't want to share your files with others you can change its privacy to Private and no one will be able to access except you.
- Create and collaborate: Google drive provides you the flexibility to host different kinds of spreadsheets.
- All this for Free: Yes all this is for free, you don't have to pay a penny for hosting you files on Google Drive.
How to Host CSS in Blogger Using Google Drive
Step 1. First of all you've to create the
CSS file. To do this, copy the CSS code from your template that you want to upload. Log in to your
Blogger Account >>
Template >>
Edit HTML >>
Search (Ctrl+F) for
<b:skin><![CDATA[ tag and copy the code till the
]]></b:skin>.
Step 2.
Prepare your style.css file After copying the CSS code paste it in the
notepad and
remove that code from your template. Now save the notepad and name it as
style.css.
Note: The file extension must be in .css
Step 3. Now you've to
host your CSS file. Go to
Google Drive and log in to your
Gmail account. Click
Create >> create a new
Folder >> Name it whatever you like such as mycodes or myscripts etc. and click
Create button
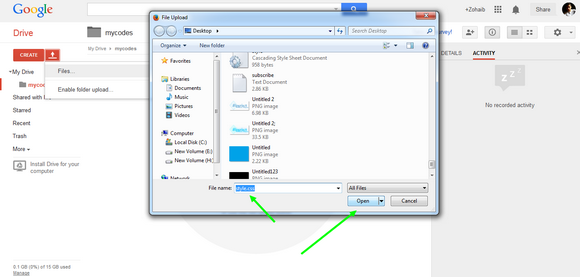
Step 4. Open that
folder >> Click
Upload button and choose
Files >> Now it will request you to choose your files, so
select you file and click the
Open button. A wizard would appear on the right side of your screen displaying your upload status.
Step 5. Once the file is uploaded, click the
Share button >> Click the
Get Shareable Link and choose
Anyone Can View the File option. It will provide you the sharing link
Step 6. The sharing link would be something like
https://drive.google.com/file/d/your-unique-file-code but you have to change it to
https://googledrive.com/host/your-unique-file-code. For example if my file link is
https://drive.google.com/file/d/0B43vwjPtKakCODMzcEc2amM3ZTQ so i will change it to
https://googledrive.com/host/0B43vwjPtKakCODMzcEc2amM3ZTQ, Hope you got it.
Step 7. Its Time to
Add your File/Link to Blogger. Log in to your
Blogger Account and go to
Template >>
Edit HTML. Now search for the
<head> tag and paste the below code just above/before it.
Note: Don't forget to replace https://googledrive.com/host/your-unique-file-code with your file link that we created in the previous step and make sure that you've removed the CSS code from your template as we mentioned in the step 2.
<link href='https://googledrive.com/host/your-unique-file-code' rel='stylesheet'/>
Step 8. Click the
Save Template button and you're done!
How to Host JavaScript in Blogger Using Google Drive
To host JavaScript on Google Drive, you have to follow the same steps, the changes are that the file
Extension must be in .js form in case of JavaScript and for adding it to blogger use the code below
<script src='your-googledrive-javascript-link-here' type='text/javascript'></script>
Congratulations: You've successfully hosted your CSS and JavaScript in blogger using Google drive.
From Editors Desk
We hope that you've learned How to Host CSS or JavaScript in Blogger Using Google Drive. Share this tutorial with your friends and don't forget to subscribe us!
Got a Question? Please don't hesitate and ask us in the comments section below. If we missed something, then leave a comment below.

.png "How To Add Multiple Authors To Blogger Blog") It'll ask you to enter the Email id's of the new authors, enter the Email id's of your authors and hit the Invite Authors button.
It'll ask you to enter the Email id's of the new authors, enter the Email id's of your authors and hit the Invite Authors button..png "How To Add Multiple Authors To Blogger Blog") An email invitation will be sent to the specified persons. When he verifies the invitation, his name will be listed and you can decide his account type as Admin or Author.
An email invitation will be sent to the specified persons. When he verifies the invitation, his name will be listed and you can decide his account type as Admin or Author.


.png "How to Host CSS or JavaScript in Blogger Using Google Drive")
.png "How to Host CSS or JavaScript in Blogger Using Google Drive")
.png "How to Host CSS or JavaScript in Blogger Using Google Drive")
.png "How to Host CSS or JavaScript in Blogger Using Google Drive")
.png "How to Host CSS or JavaScript in Blogger Using Google Drive")
.png "How to Host CSS or JavaScript in Blogger Using Google Drive")

.png "How to Enable Captcha/Word Verification in Blogger")


.png "How to Embed Google Maps in Blogger")
.png "How to Embed Google Maps in Blogger")
.png "How to Embed Google Maps in Blogger")

.png "Enable or Disable Mobile Template of your Blogger Blog")
.png "Enable or Disable Mobile Template of your Blogger Blog")
.png "Enable or Disable Mobile Template of your Blogger Blog")


